Complete Amateurs

So the title of this post and layout comes from the name of a 'band' I 'sang' in, you can probably tell by the name that the 'music' isn't great... I decided to set myself the challenge of not using any paper other than the background white cardstock on this layout. I managed this summery floral theme which has quite a different feel to the papers in the main kit.

The layers around the photo are journalling cards/tags which I cut in half so they could go either side of the photo.
 I ran out of 'E's (typical!) so I cut my title from another tag by hand drawing letters. I really liked the floral journalling card.
 For my clusters I used a combination of die cuts and fussy cutting from embellishment cards. I popped some elements up with foam to add dimension and added a few extra details (those plastic flowers!)

I like how the chalkboard label stickers add the dark contrast. It was surprisingly easy to create a full layout without using any patterned paper.

I Have No Words | ScrappyNerdUK (Claire) | May/June 2017 (Explicit content!!)

Hello Friends. Before continuing on to the photos below, I need to warn you that they contain "explicit content". Well, My friend had a balloon that she placed in a promiscuous place. For pure laughs, I knew I had to scrap this photo. For a giggle.....please read on....


So I took inspiration from the paper with all the letters. This was far too busy a background for the style that I scrap so I decided to cut out all the letters and round off each of the corners.

I thought forming a circle with these letters was a really good idea as I already knew the title for my layout was going to be "I have no words" and having random letters and punctuation next to each other in the circle, really seemed to fit the theme of my layout.


Here is that photo I warned you about. I hope that this balloon placement doesn't offend anyone!!

I used some papers from the kit to layer behind my photo and I tore around the edges of the paper to get some of the white inner of the paper to show through so it would break up the pink from the paper and the pink from the cardstock.


Onto embellishing and this took me about 10 minutes - super quick. I used a branding strip that had all different sentiments on and just cut this down and scattered each of these around the circle of letters. I then added some of the word stickers from PinkFresh Studio sticker sheet from the main kit. I then finished these clusters off with a couple of the Heidi Swapp fabric bows from the Main kit.

The last addition was some of the sequins from the kit. This was all finished off with a roller phrase stamp from my stash with different sentiments stamped at each cluster point around the circle.

And here is the finished layout. I hope this gives you some inspiration for finishing your kit off, or at least given you a giggle.

See you all tomorrow....

Claire


You Are Amazing | ScrappyNerdUK (Claire) | May/June 2017

I'm back.....And you're in for a treat as I am sharing 7 layouts in 7 days to finally "kill" my kit.


So....I drew inspiration from the cut apart sheet and loved all the sentiments and knew that I couldn't use it as a whole page. So I set to cutting them apart and spreading them in a random order across my 12x12 sheet of white cardstock (also from the kit).


I even used some of the branding strips as a bottom border and I love being able to use every last strip/offcut of paper.


I loved the ephemera we received in the main kit. And I loved the florals which I knew that I just had to fussy cut out. I made this into a cluster to the bottom right of the photo.

I then also used some of the floss by separating the strands and created a messy bundle of this underneath the cluster and glued this all down into place. I then added some more of the floss to the left side of the photo to create some more interest around the photo.

I added 2 of the Heidi Swapp bows to the layout also as these matched perfectly.

This was all finished off with a few clusters of sequins dotted around the age in 3 areas, to create a visual triangle.

And the finished layout....


Stay tuned for tomorrows inspiration. Bye friends!!

Claire x

Run woman run!

5 years ago I did Couch to 5k and was working my way up to 10k (well i was running 7 pretty regularly) when I moved to Devon and you know, hills. So it all stopped. Then a new group started up where I live now - which is flatter than Torquay and I decided to give it another go. And now I am running a few times a week. So expect many running themed layouts to come (I say run, its more like a small stubby strawberry lolling along in my opinion!). I went to a Parkrun and my lovely husband surprised me by turning up to cheer me at the end  and take photos. Sadly so far its still my only Parkrun, but I hope to have another go soon! 
Anyway, it all needed celebrating and the most important thing is how helpful the fabulous kit was (as ever!)
 Seeing as my running gear is all pink (why? why does most running gear come in pink?) the peachy pink papers were perfect. I decided to keep the rest neutral with lots of grey and some pops of green and pink from those fabulous phrase stickers. The grey diagonal stripe behind the photo isn't paper, its the backing card from some of the embellishments.


I chose some toning butterflies to represent me changing (!) and fussy cut them out. The writing on the photo was done using Picasa. I gave everything an outline to add some definition and then played about until I was happy with placement and stuck it all down.


It was pretty simply done and a fairly swift layout to do - having everything together as a kit means you can concentrate on having fun playing and telling the story which is what it is all about for me! 
 

Pre- DMB Project Life Page - Natalie


Hello everyone!
I'm back today with a 12x12 Project Life page using the May/ June Quirky Kits. 

I decided to do a Project Life/ Pocket Page layout as I've been making a lot of 12x12 layouts recently, and these floral cards from the May/ June Customs Card kit were just so beautiful! 

This layout was really quick and easy to make, taking less than 30 mins (a miracle for me), as I had already printed the photos and put them in pockets around a year ago (hence the rounded corners). These photos are from before a university summer ball. 

I thought the colours in the floral pattern, the pinks, greens, purples and blues matched the dresses we were wearing perfectly. 


I decided to use this floral 4x6 card from the Customs Card Kit for my title card, as it was so busy I decided to add a small title, using an acronym rather than the full title. The black glitter Heidi Swapp alphabet was from the Extras shop, and then I used some tiny letter stickers from my stash to spell out "pre". I then added a label, from my stash, there was a label in the Customs Card Kit which matched perfectly, but I messed up my stamping so had to find another! And finally one of these beautiful butterfly 3D embellishments (Customs Card Kit). 


I added two filler cards to this spread, both from the Customs Card Kit. On this filler card all I did was simply add a butterfly.


This filler card is beautiful it's a text print with splatters, so no need to add them yourself! I kept this card very plain as my layout is very busy and I wanted somewhere for your eyes to rest. 
I added two flowers which I fussy cut out from the exclusive ephemera pack in the main kit. And just added two tiny phrase stickers.


To this photo I added a label which I love because it has the same floral design (Custom Cards Kit). I just added everyone's names on the label, and added a further fussy cut flower.

I then saw that the main kit exclusive ephemera pack had a tag with the same floral design, so I decided to use the tag to add some extra journalling, by just placing the tag behind one of the photos (super simple to do if you're using a project life style page protector).


To the tag I added a black tab (Main Kit). Normally I would stick the tab on the back, however as I was going to journal on the back I didn't want you to be able to see the glue, so as the tabs were adhesive backed, I just added two back to back to attach them to the tag. And I added another two tiny phrase stickers.


On the back of the tag I added some journalling. This is a great idea for if you have secret journalling you don't want others to read, or you simply don't have room elsewhere on your layout for journalling. 


I hope you like this Project Life layout! See you soon with more layouts using the new July/ August kits!! :D 


Frozen in Time

For this layout I wanted to play with the vintage elements in the kit. This is very different from my normal style, so to ease me into it I used my usual white background so I still had that clean feel. The photo is from my grandpa's house, it's a nice photo of my family but the decor is pretty dated (even in black and white!) I thought this would make it suit the layout.
 I love the butterfly paper so I fussy cut a few to arrange around the photo. I was planning more but my photo is so small I didn't want it to be dwarfed.
 In terms of journalling I did a line at the bottom of the layout just to get in my thoughts, but these word stickers kind of sum up the gist of my emotions.
 The curly glittery writing definitely suits the word 'frozen' and I liked using a mix of alphabet stickers for the title.
After photographing the layout I decided to add some ink splats for some contrast. I hope this helps you go out of your comfort zone.

Sketchifying

When I only have a short amount of time to play, sketches are just a dream! I used two from the most recent booklet that Leo put together.

 This one tells the sad story of saying goodbye to our old car following a simple shunt. Because of its age and mileage it was written off almost immediately.
I was inspired by the thread to do some simple embroidery and used the same idea as in the sketch - a speech bubble. It would probably have looked better to have the words inside the bubble or at least the same side as the bubble points too - but it doesn't...

I picked out some of the papers that toned with the photos and the backing page. I drew the speech bubble on the back and with a needle from my ancient Making Memories craft kit (including hammer and implements to add brads the proper way - that's how long I've been crafting!), made some regular spaced holes on the back of the layout and used the thread from the kit to backstitch the pattern. I listened to an audio book whilst doing it (the amazing "the Girl with all the Gifts") and it didn't take much time at all.


I thought it would be fun to use the alphabet tile paper to make the car's registration. That worked because the "s" looks a bit like a 5! That wasn't meant to be the title, the tiny letter stickers (not from the kit) were and in hindsight I wish I could swap them round.


Because there was so much space around my too small title I added the sparkly bow ties. Nothing to do with the car really! A die cut, black tab or two and some sequins later and job done.

 
The second sketch also features sewing but I decided once was enough!
 I always love it when special moments happen - like the green of my drink and the veggies being an exact match to the green of the little phrases!

This sketch has lots of layered strips and a big one just under the photo and basically that us what I did. A black outline does help each pattern pop in my opinion and I use a lot of the branding strips as well as everything else. I chose my layers, put them on the page to see if I liked where they were, took them off for outlining and then replaced them roughly where they had been but always wondering if they were placed as well as before. Yes, taking a photo and looking at it would be a better idea!

I had to use this sticker as Carys can use chopsticks and I can't!
The flower was on one of the lovely cards but I cut it down to look better on this page
More of those lovely sequins!


Typhoon Problems - Natalie


Hello everyone! 

I'm back today with my second scrapbook layout and a mini Project Life insert with the May/June scrapbook kit! 

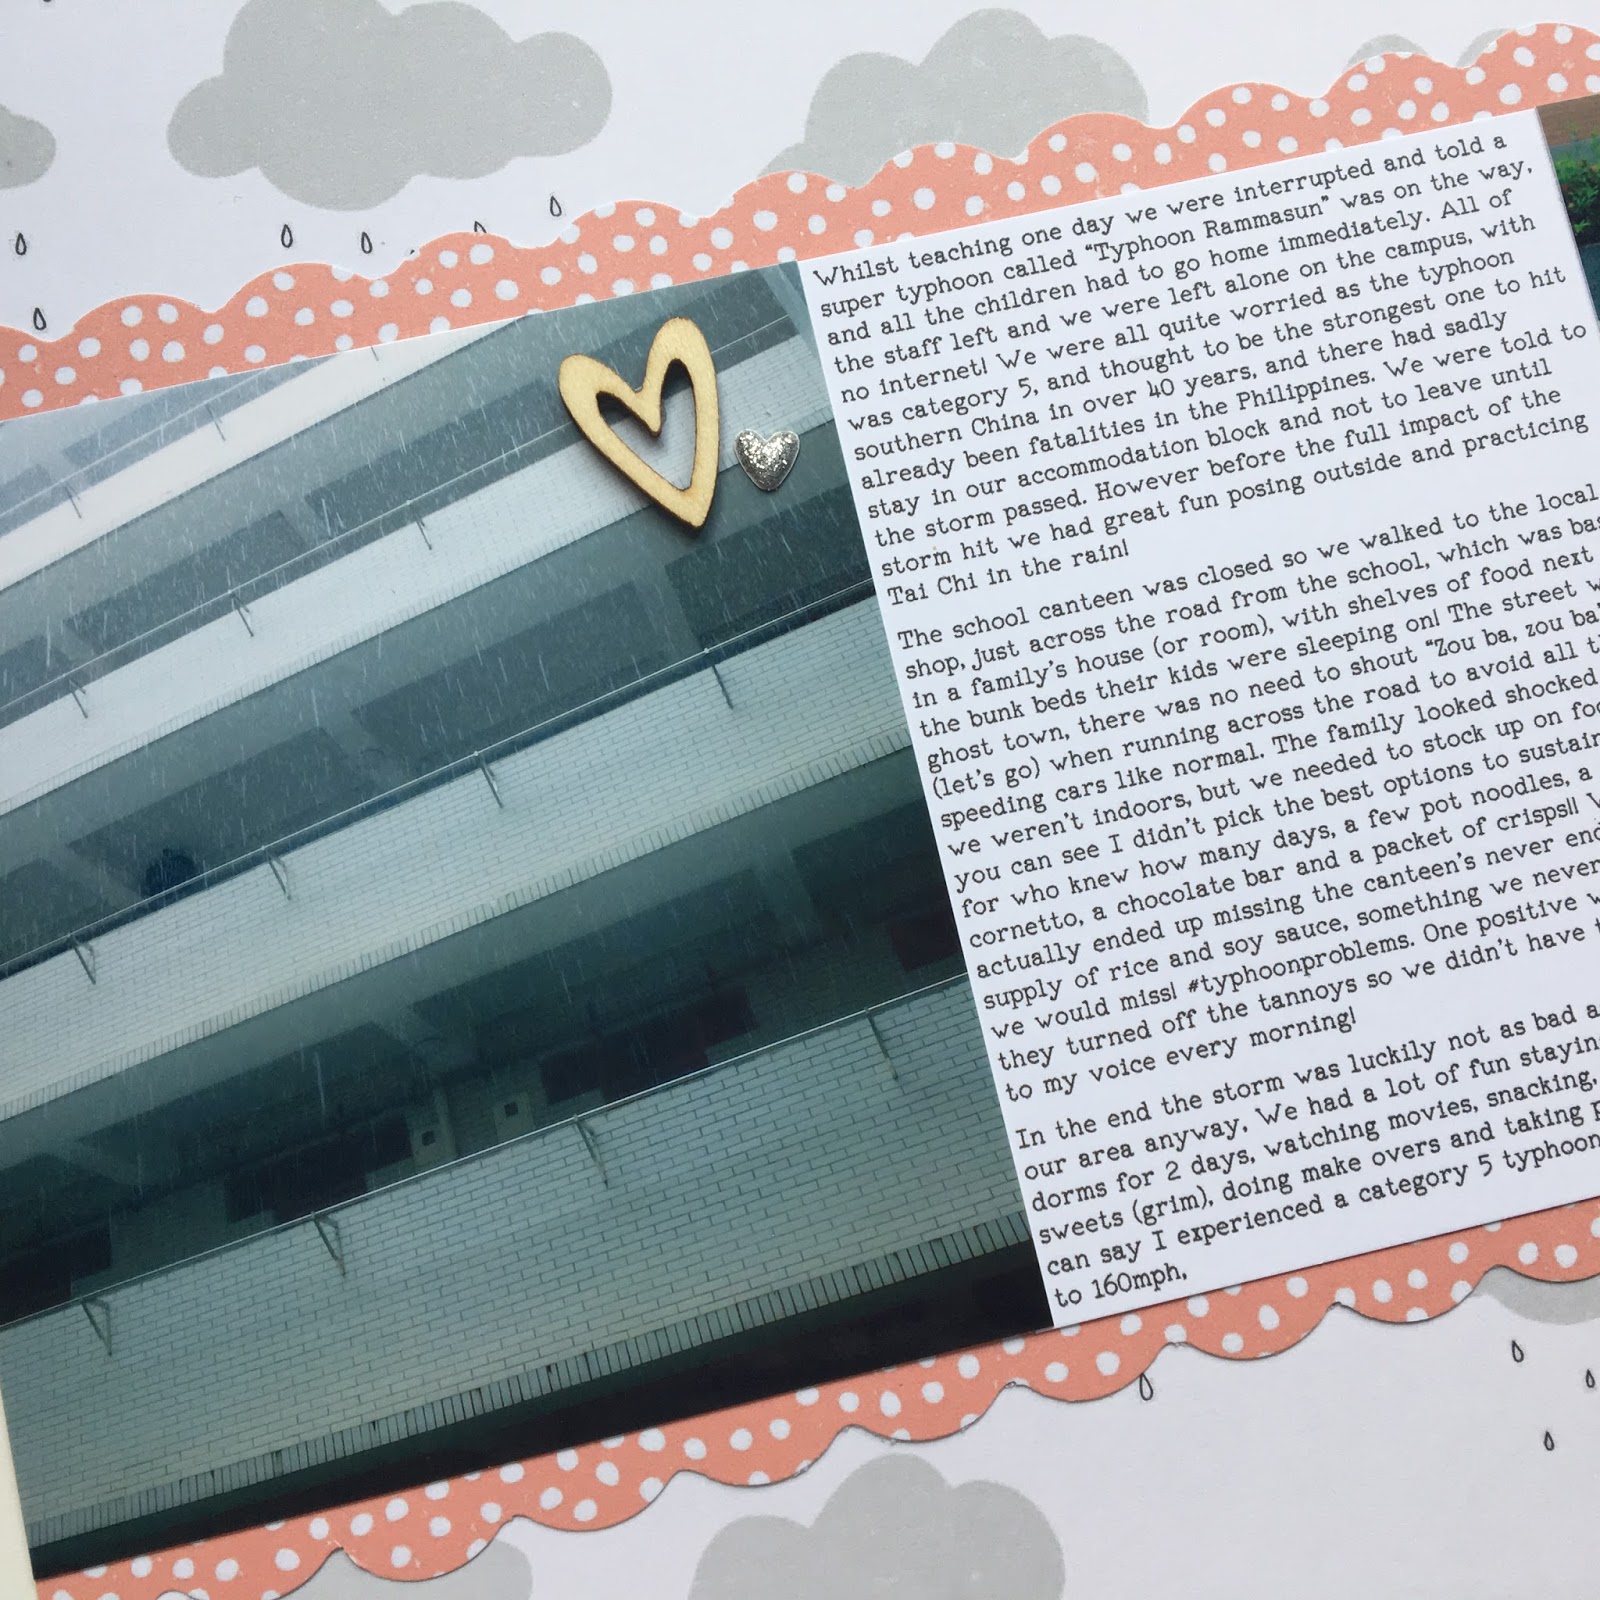
I started off with this beautiful background paper with rain clouds on (Kaisercraft Curious B side, Lite Kit), and was thinking about any stories to do with rain I wanted to tell. I decided to scrapbook about when I was caught up in a typhoon during a trip to China. 

This layout was quite simple to put together because I followed a sketch, which required a 6x4 photo, a journalling block and a 4x4 photo along the centre. As you can see for my 6x4 photo I used a collage of 3 photos. 
I used my scallop border punch, which I absolutely love, to create two borders using the beautiful pink spotty paper (Kaisercraft Muse B side, Main Kit), above and below the photos. 

 I decided to type my journalling out, using my favourite typewriter font, and printed it on plain white cardstock. 

For my title I used these gorgeous silver alphas (Heidi Swapp, Main Kit), I love the font it's so whimsical. I also used some Elle's Studio white alphabets from my stash (the same style as the mint alphabet we had in the last kit). I thought the white alphas worked perfectly, against the white background, as I wanted it to be subtle.
I added a cloud wood veneer from my stash. 

In the bottom left hand corner I added another strip of scalloped paper, to echo the design above. As well as this cute compass embellishment, which I made by using my circle punch on one of the cards from the Custom Cards Kit, designed by Leonora! Remember you can always edit the custom cards to make them into embellishments if you wish!
As well as another wood veneer, and a tiny silver heart which is from the Heidi Swapp alphabet set (I love when alphabet sets include little matching hearts and stars). 


I decided to create a small 6x12 project life insert to go alongside the 12x12 layout. This is one of my favourite things to do, as I often find a 6x12 insert is enough to just expand the story a little more, and to add a few more photos. 


I used more of the beautiful cloud paper, and printed off a screenshot about the typhoon from Wikipedia, something I've not done before, but will definitely be doing again!
The pink and white striped card is from the Customs Card kit, designed by Leonora, and the colour is an absolute perfect match to the pinks in the Kaisercraft papers! I added some more wood veneer, another tiny silver heart, and two grey heart die cuts (exclusive in the Main kit). 


I really like the colours of this layout, and I hope you do too! 
See you soon, with more inspiration from the beautiful kits!

Double the trouble

Hi Leo here!

This double layout's kept me busy for a few days now. I started out with the idea to do a pocket page then still had a 6x4 photo to scrap from the same photos so I decided to make it into a double layout with a single page on the opposite side. The pocket page is a Design A page protector that I've adapted using sewing to give it 12 3x4 size pockets by just sewing with the machine down the middles of the 6x4 pockets to split them into two. I've then filled in with the pockets using the cards and embellishments from the kit and I've added some more embellishments from the embellishment kit. The Pinkfresh chipboard was in the last custom card kit so I had a few of those to use up.

 
The pocket shaker card was created by filling the pocket with the sequins and the die cut, (from the lite kit) then I've stitched around it to seal them inside.
 
Next the single page, it's a 9x12 size as I like to mix up my pages in my album. I've started the layout the day before by sewing the 'go' part of the title right on to the Heidi Swapp paper from the main kit. I used the die cut letters from the last main kit, (March/April) to draw around then stitched along the lines. The rest of the title I used a circle of patterned paper, (one from the lite kit, I'm using up lots of the scrap bits I have left over) and I've added a banner over the cut edge that itself is cut from a custom card turned to the white side and the letter stickers are fixed over the top. I started the layout basing it on the take 5 challenge that UK Scrap Addicts are running right now.  I picked the 'use numbers' part of the challenge and there are five others I needed to incorporate, 'use a patterned background, use a half sheet of stickers, use embossing powder and use a large title. So this is the point I need to use some numbers and I made a count down from 10 to 1 to run along the circle, (guess at this point it's a semi-circle?) edge.
The embossing powder element I worked in using a tiny heart stamp and some turquoise embossing powder over them. They're kind of scattered around the background. After those I added some more enamel dots from the lite kit. and my leftover sticker sheet is the tiny butterfly stickers that were in the custom card kit.

 
To finish it off I've gathered the scrap paper pieces I wanted to use and made some more in the same shape by cutting some of the pocket cards from the custom card kit in half. My photo I've trimmed down a little then matted it to one of the 6x4 custom cards. On one of the pieces I've sewn a star like I created on the video in subscribers group last weekend.

 
To start with I'm going to add my photo and because I know I want to add more around it I'm just added my adhesive to the middle on the back of my photo. I've added it to the page with the 'moon and back' paper from the lite kit behind it.

 
I love this glitter tape in the custom card kit it's all the look of glitter with none of the messy application! To use it I've cut the top corner off a piece to make it into a kind of arrow.

 
I've then added the tape over the top at a slight angle to try to show movement, like come on let's go! :)

 
Now I'm just mirroring the elements on both sides using the paper pieces I have and another piece if the tape.


I still felt it needed a little more to bring the eye up from the photo to the title so I've use the tiny heart stamp again and added a little more yellow.


And here's finally my finished layout!


Hope it's given you some idea on how to use the custom card kit cards in different ways. :) xx Leo