Your yummy new Quirky Kits are out on their way and should be arriving with you this week.
Stop back here for some inspirational ideas over the next couple of weeks or get out there with your camera and get clicking away and record the beautiful Spring we're having so far.
Happy scrapping!
xx Leo
Mini Book Mania
Hi!
If you have some leftover bits and pieces of kits put them to use making some fun mini books. I've got two examples to show you today I've made with mixed up bits of Quirky Kits.
Arty Minibook
This is a really simple book to make and you can adapt it to suit your needs.
You'll need:
1 12x12 sheet of Sassafras patterned paper, (with the decorative trim).
2 sheets of 12x12 cardstock
Leftover patterned paper scraps and stickers to decorate
Spray mist, (optional)
Alphabet stickers for titles
Ribbon and trim leftovers for decorating.
Method:
Take a sheet of the Sassafras paper and cut it to 7.5 inches width, leave the decorative strip on the bottom. Turn the paper around and fold it in half.
Score and fold a ¼ inch line at each side of the center fold line and fold along them to create a spine. This will be your book cover.
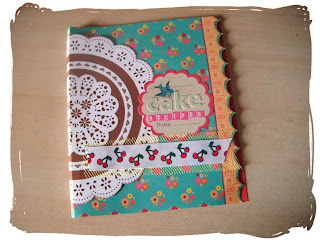
Decorate your cover. I’ve used the middle of the diecut Pink Paislee paper from the Makes Me Smile kit, a Sassafras sticker, alphabets and some trim, (this was leftover from the Juicy Fruit Quirky Kit).
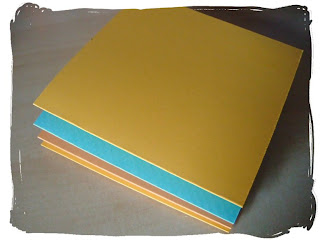
To make your inside pages trim some cardstock in half to make 6x12” size pieces. Fold them in half. I’ve made four but you can make a couple more if you want extra pages. Lay them all in a stack with the right sides facing inwards.
Open out one of your cover pieces and glue the left side of your first page to the inside of the cover. It needs to fit inside your book cover so the outermost folds match up.
Keep the page folded and put some glue or tape on the back then add the next page on top of it. Repeat with the next page on top.
When you get to your last page glue it on the right side of the inside of your cover so it matches up to the fold on the right.
Put some tape or glue on the left side page and fold the opposite page over so they stick together and complete your basic book.
When you open your book the pages should spring open nicely.
Now your book is ready to decorate!
I've used tags and stickers to decorate and used spray inks on the pages with a doily as a mask. The paper doily was from the She's Creative Quirky Kit.
Back of the cover
My Space mini book
This one is based on a class I've done for UK Scrappers. I love these little tiny 4x4 books they're great to give as gifts for kids to fill in and perfect for using up smaller leftovers. You can download the class here,
http://www.ukscrappers.co.uk/images/stories/library/pdfs/myspaceminibook-craftytemplates.pdf
So there you go, two ideas to use different amounts of leftovers. Get busy with your older leftovers before your new kit arrives!
xx Leo
If you have some leftover bits and pieces of kits put them to use making some fun mini books. I've got two examples to show you today I've made with mixed up bits of Quirky Kits.
Arty Minibook
This is a really simple book to make and you can adapt it to suit your needs.
You'll need:
1 12x12 sheet of Sassafras patterned paper, (with the decorative trim).
2 sheets of 12x12 cardstock
Leftover patterned paper scraps and stickers to decorate
Spray mist, (optional)
Alphabet stickers for titles
Ribbon and trim leftovers for decorating.
Method:
Take a sheet of the Sassafras paper and cut it to 7.5 inches width, leave the decorative strip on the bottom. Turn the paper around and fold it in half.
Score and fold a ¼ inch line at each side of the center fold line and fold along them to create a spine. This will be your book cover.
Decorate your cover. I’ve used the middle of the diecut Pink Paislee paper from the Makes Me Smile kit, a Sassafras sticker, alphabets and some trim, (this was leftover from the Juicy Fruit Quirky Kit).
Open out one of your cover pieces and glue the left side of your first page to the inside of the cover. It needs to fit inside your book cover so the outermost folds match up.
Keep the page folded and put some glue or tape on the back then add the next page on top of it. Repeat with the next page on top.
When you get to your last page glue it on the right side of the inside of your cover so it matches up to the fold on the right.
Put some tape or glue on the left side page and fold the opposite page over so they stick together and complete your basic book.
When you open your book the pages should spring open nicely.
Now your book is ready to decorate!
I've used tags and stickers to decorate and used spray inks on the pages with a doily as a mask. The paper doily was from the She's Creative Quirky Kit.
My Space mini book
This one is based on a class I've done for UK Scrappers. I love these little tiny 4x4 books they're great to give as gifts for kids to fill in and perfect for using up smaller leftovers. You can download the class here,
http://www.ukscrappers.co.uk/images/stories/library/pdfs/myspaceminibook-craftytemplates.pdf
So there you go, two ideas to use different amounts of leftovers. Get busy with your older leftovers before your new kit arrives!
xx Leo
Ribbons & Resins Final Peek!
So here is the final peek of the upcoming March/April kit 'Put a Spring in Your Step'. Resins are a big trend right now so I've picked out some cute ones to use from Websters Pages and American Crafts. Love these delicate little birds!
The ribbons will both complement and contrast with your papers.
So what do you think of the next kit?
Now's the time to start planning your pages as your next Quirky Kit dose will be shipping out to you around this time next week. We're just waiting for the Lily Bee papers to arrive then we'll be set to go. :)
xx Leo
Put a Spring in Your Step Peek #2
Today I've got a sneak peek of some of the non generic more quirky elements in the next kit.
We've got some cute handmade felt blossom embellishments, some fun kitschy buttons, a lovely houndstooth fabric, some fab tulle net and some very fun union jack cupcake picks.
The tulle net is great for adding texture to your projects, cut out pieces and layer it between patterned papers. It can also be used to soften patterns too so have a go at layering it over a patterned paper before you add your photo on a scrapbook page or a main embellishment on a card and it'll help it to stand out more against the pattern.
The little flowers provide texture and interest and because they're handmade you're not going to find the same ones everywhere.
I love these buttons they've got great texture too. The black and white ones are going to work with everything in the kit so you're not umming and arring about what to use, same goes for the black and white houndstooth fabric. I wanted to add some black and white because it helps to make all the colours come together and 'pop'. You can cut the fabric into strips and use it like ribbon or make some rolled flower embellishments, use it as a background or diecut it into shapes.
Finally there's the fun union jack cupcake picks. It's the royal wedding on the 29th of April and I'm sure we'll all have something to go in our scrapbooks about it so these could make great quirky embellishments. You could also of course stick them in the tops of your sandwiches or cakes on the day for a fun royal wedding tea time then take pictures to scrapbook! lol
The last sneak will go up tomorrow or the day after, we've got a peek at resins and ribbons that will be in your kit!
All going to plan the March/April 'Put a Spring in Your Step' kit will be ready to ship out to you in around a weeks time. I'll send emails out when everything is ready to go so you can pick another shipping date if you need to.
xx Leo
Put a Spring in Your Step
The March/April kit is coming together now so I'll be sharing some sneak peeks of the kit over the next couple of weeks.
I'm going to share a first peek of some of the lovely papers I've picked out.
I love how spring makes us look to nature, when the weather warms up a little it makes us want to venture out so that's where I started with this kit. As well as having naturalistic elements like the woodgrain and the leaf print there's also a contemporary twist to it as the prints are graphic and modern.
You can pick out the more natural tones for a subtle look:
This Lily Bee paper just shouts out spring to me, the lovely spring green and yellow colouring and the fun motif. We've got more Lily Bee too:
Last but not least there are a couple of Websters Pages prints in your kit too. What a fab April page this lovely diecut will make:
I'm going to share a first peek of some of the lovely papers I've picked out.
I love how spring makes us look to nature, when the weather warms up a little it makes us want to venture out so that's where I started with this kit. As well as having naturalistic elements like the woodgrain and the leaf print there's also a contemporary twist to it as the prints are graphic and modern.
You can pick out the more natural tones for a subtle look:
Or add some drama with the bright punchy colours.
One thing that will be missing that I wanted to get is the Houndstooth Pow paper from American Crafts. I just got told it's out of stock at the last minute, (love when that happens!). It's so lush we're defo still having some but it'll be making it's appearance in the May kit instead. I have found something as a replacement though, will share in some more sneak peeks later on!
xx Leo
Subscribe to:
Comments (Atom)


