Fantastic - Natalie

Hello everyone I'm back today with a new layout using the May/Jun kit!


Supplies used:

Main Kit:
- Fantastic Cut File
- White Cardstock
-  Amy Tan Stay Sweet - Summer Slices Paper
- Amy Tan Stay Sweet - Popsicle Summer Paper

Lite Kit:
- Amy Tan Stay Sweet - Prickly Hug Paper

Extras Shop:
- Amy Tan Stay Sweet Foam Phrase and Icon Thickers

Own Stash:
- Wood veneer
- Enamel dots


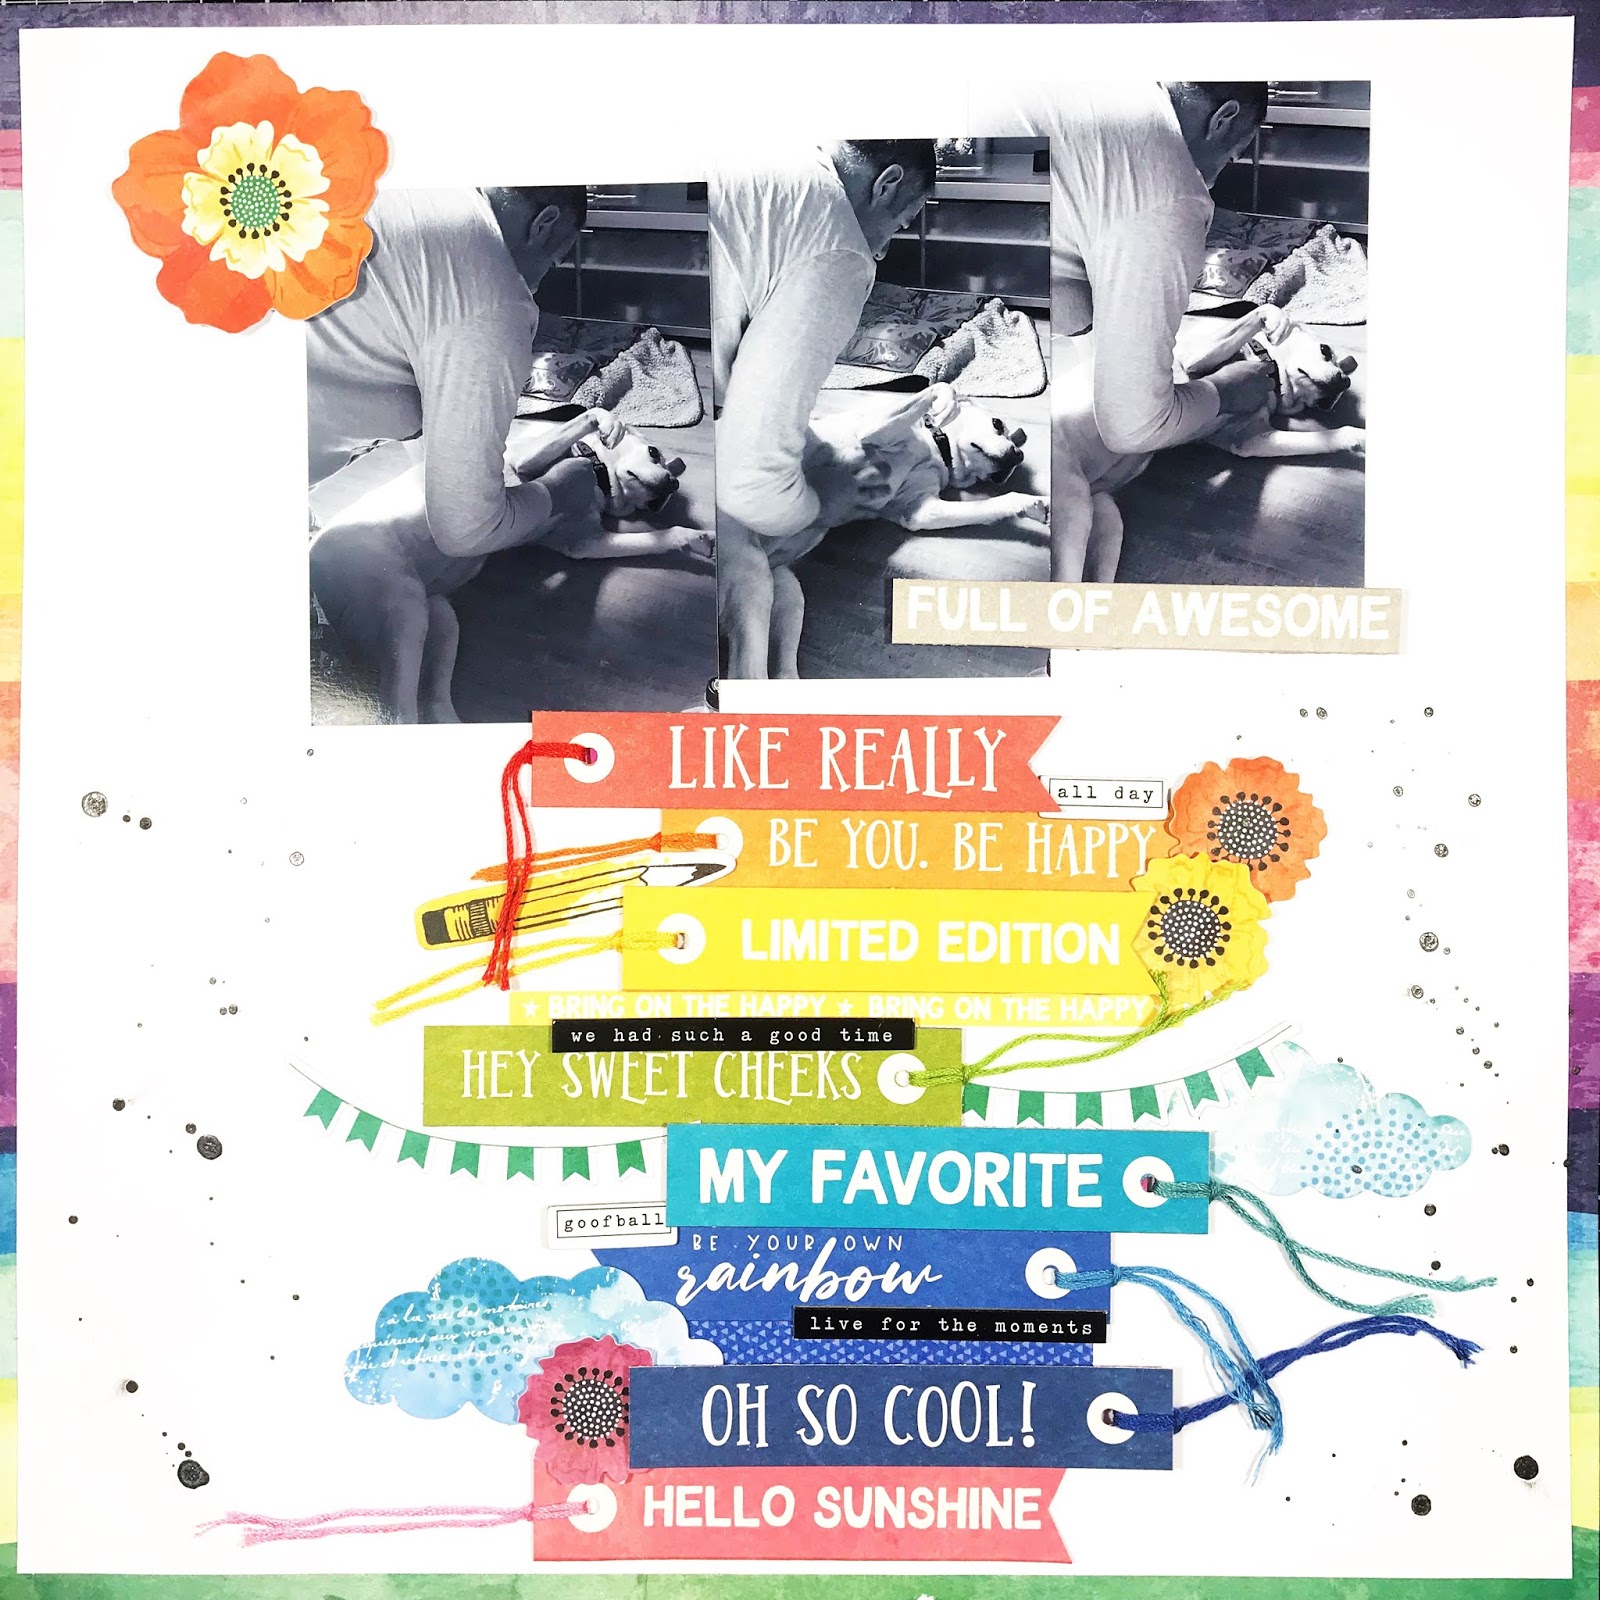
I started this layout by backing the "Fantastic" cut file using the Summer Slices and Popsicle Summer papers in an alternating pattern. 

I picked a photo of me staying in a tree house hotel in Sri Lanka on a farm with lots of tropical fruits - perfect for all the fruits in the Amy Tan papers.


I tried using white cardstock as my background but I felt the cut file just didn't stand out well enough against the white. So I decided to use the B side of the Prickly Hug paper, which is this beautiful yellow, which I think makes the cut file stand out perfectly. However I felt the layout needed containing so I trimmed the yellow paper slightly on 2 sides, and backed with white cardstock, which matches the white outline of the cut file. 

I simply matted my photo on white cardstock too. 

I love the foam fruit icon stickers from the Thickers pack so much! I fussy cut some of the tiny fruit slices from the Summer Slices paper and used them across the layout.


I used another foam icon sticker "Hello Weekend" to continue my title and draw the cut file and photo together.

Finally I added a few wood veneers and enamel dots from my stash.


A simple layout but I just love the bright colours!


Natalie x

Just me and My Beau | ScrappyNerdUK (Claire) | May/June 2019

Here is the final layout from me using this months kit.

Would it surprise you if I told you it was a rainbow layout!?

I had to use the rainbow doilies from the main kit on this layout and had been fussing over my design for a couple of weeks about what I was going to do with them. I had an idea to create a rainbow shape with them. I was chatting away to a scrappy friend about the doilies and she said "why don't you use them in a rainbow shape" and so that confirmed my decision and was exactly what I was going to do.

This layout came together very quickly because all the hard work was done in the doilies.

Before I stuck the doilies down, I grabbed my Heidi Swapp ink sprays and splattered some in co-ordinating colours so I used, Butter, Hot Pink, Tropicana Teal and Wilted and Amethyst. I then stuck my doilies down and added in some of the fussy cut hearts from the Vicki Boutin paper and a couple of 3d stars that I had made. Finally I added my title and photo.

I wish there was something more I could say about this layout but that's it.

Something so effective and unique in design and it was probably the quickest layout I have made in the last couple of months. It took me longer thinking about the design of it then actually creating it. We need to learn not to procrastinate as it eats into our scrappy time....right?!

Thanks for reading my Blog posts and I will see you back here shortly with some more inspiration from the next kit!!

Claire x


Rainbow Tag Album | ScrappyNerdUK (Claire) | May/June 2019

This is my third project with the current kit.

Again, I really like to make the most of my papers and not only did I create a layout with the labels from the Jillibean Soup paper from the Lite kit, but I also made a little tag album with the rest of the tags too.

This is the most simplest and easiest mini album that you can create so if you've never made a mini album then this is the one you should start with, for sure!!

I cut apart all of the labels and punched a hole in each with my WRMK Big Bite tool thingy (basically a fancy hole punch, which I have a really funny story to tell - I was coming through US Customs and got stopped because it showed up on my bag. So they asked me if I had any weapons in my bag to which I replied no. When they pulled out the Big Bite I said it's a hole punch and giggled - they were not amused. They inspected it and let me on my merry way).

Once I had done this I then added a 2 inch book ring to keep all of the tags together and believe it or not, my mini album was made!!

I added in small 2x2 inch photos and little bits of ephemera and chipboard from the kit.

I then grabbed some ribbon from my stash to create a little ribbon hassle (great way to use up ribbon!)

I added a piece of acetate to the front (which you can cut from old packaging if you don't have any acetate) and my album was complete.

I still have room for more photos in mine and the great thing is that I can add some more tags if I wish as there is plenty of room!!

I hope that you have enjoyed this inspiration and I shall be back again tomorrow with my final project using the current kit!!


See you tomorrow


Like Really | ScrappyNerdUK (Claire) | May/June 2019

Here I am to share my 2nd layout from this month with you.

I did this one LIVE over at the Quirky Kits Facebook group (which if you're not a member then you should come over and see what it's all about!)

So - for this one I used the paper that was in the lite kit....from Jillibean soup. I bought this as an extra from the shop because again, I was just drawn to the rainbow colours.

I had already decided that I wanted to cut all of the labels out and create a layered label stack up my page. I went into my stash of embroidery floss and grabbed some co-ordinating colours so that each of my tags would have the same colour thread.

I started from the bottom of the layout and before sticking anything down I layered the pieces to see if the position would be ok and that I would have enough room at the top of the layout to add my photos. Once I was happy with this I then started sticking the labels down, some of which I stuck straight to the white cardstock and others I added in some foam to give them some dimension.

I then used the Vicki Boutin ephemera from the main kit to add in some tone on tone embellishments. So I used the blue clouds, the green banner, the yellow pencil (random but who cares right>!) and finally added in the flowers too.

Again I printed my photos in black and white and I decided not to mat these (something I rarely ever do is leave my photos without a photo mat!!).

I then staggered my photos at the top of the page to create a little more interest, especially as the photos were very similar as they had been taken as a multi shot but love how repeat photos look.

I backed my white cardstock with a gutted piece of Vicki Boutin rainbow paper (which I used for my previous blog post) and added in some of my much loved ink splatters.

And here is layout number 2 complete.... See you tomorrow for project number 3!!

Fantastic | ScrappyNerdUK (Claire) | May/June 2019

So I've been totally rubbish at sharing my layouts from this kit on the blog. It's just been one of those months and has been on my to do list forever so thought I should share them here whilst I have a spare couple of hours to edit the photos and write up all the blog posts......

So here is the first of the 4 projects I made this month...

I of course had to use the Paige Evans cut file and knew straight away that I wanted to back it with the stripey rainbow paper from Vicki Boutins collection.

I made use of the rainbow hearts paper by fussy cutting some of these to create my "ephemera" around the page as I wanted it all to co-ordinate. I used a white Posca paint pen from my stash to add some accents to these hearts and I love the way this looks.

As there was so much colour on the page already, I decided to use a black and white photo (something I always do if I know I'm going to struggle to match up the colours - especially on a rainbow layout!)

I then added in some of the gold glitter Heidi Swapp banners to create three little clusters and I nestled these amongst the hearts I had fussy cut. I grabbed some gold glitter heart stickers from my stash to add some accents into the "a's" in the cut file also.

I added a little strip of washi tape from the kit under the bottom of the cut file and just above the photo, especially as I had matted my photo on white cardstock - this helps provide the separation between the photo mat and the white cardstock behind.

I finished it off with some ink splatters (from my stash) and backed my layout with the Amy Tan popsicle paper.

See you tomorrow for another blog post......

Take it Away challenge #5 - no scrapbooking!

Hi Leo here!

Here are the details for the next of the new weekly challenges. The new challenge is called:

Take It Away

The new challenges are all about taking away something we use on our paper craft projects to help to give us a push to create in a different way.

How it works:
Each new challenge will be posted here on the blog and also in the Facebook Group for you to follow along with.
Complete all the Take It Away weekly challenges to be eligible for an extra goody in your next kit box! The closing date to complete all five of your Take It Away challenge projects will be 21st July 2019. All projects must be new projects made specifically for this challenge. You can use any stash you choose but it's a great opportunity to dig into your kit box and not leave it unused! If you need to catch up with the first three challenges the first one is here: https://quirkykits.blogspot.com/2019/06/new-challenge-for-junejuly-take-it-away.html and the second one here: 

For the fifth and final challenge the item you need to take away is... scrapbooking!
Yep that's right, no scrapbooking, that's pocket or whole page or travellers notebook scrapping, anything that involves a photo is out. By this time if you've been busy with your kit box you may be down to your last bits and pieces. If you don't have enough for another page with a kit rather than assimilating it into your stash keep it together and create something else with the final bits and pieces. It could be a card or a bookmark or a gift tag. It could be more than one! You might want to make some embellishments to keep on hand? How about a cute little notebook - use patterned paper off cuts and odd embellishments to make a cover, fold in half and staple together with a bunch of folded printer paper. There's so many ways you can kill that kit!

I've dug up some visual ideas here from Pinterest to kick start your own ideas:


Ready to get going?

Once you've finished your creation upload it to your platform of choice.
For Instagram tag @craftytemplates and mention it's for the Take It Away #5 Quirky Kit challenge so I can find it.
For Facebook add it to the Quirky Kits Group - they'll be a post for each new challenge there to share it to or else mention it's for the Take It Away challenge #5 when you post it so I can find it.
For blog add a link to your project from your blog in the comments below any of the Take It Away challenge posts, (like this one).
Or if you'd prefer to keep your project private you can email them directly to Leonora@craftytemplates.com

Have fun!
xx Leo


Take It Away Challenge #4 - No Paper No Problem?

Hi Leo here!

Here are the details for the next of the new weekly challenges. The new challenge is called:

Take It Away

The new challenges are all about taking away something we use on our paper craft projects to help to give us a push to create in a different way.

How it works:
Each new challenge will be posted here on the blog and also in the Facebook Group for you to follow along with.
Complete all the Take It Away weekly challenges to be eligible for an extra goody in your next kit box! The closing date to complete all five of your Take It Away challenge projects will be 21st July 2019. All projects must be new projects made specifically for this challenge. You can use any stash you choose but it's a great opportunity to dig into your kit box and not leave it unused! If you need to catch up with the first three challenges the first one is here: https://quirkykits.blogspot.com/2019/06/new-challenge-for-junejuly-take-it-away.html and the second one here: 

For the forth challenge the item you need to take away is... your patterned paper!
So last week was all about the patterned paper and if you missed your embellishments then now's the time to grab them all up because this challenge is to just use those embellishments on your page. No patterned paper at all. That means no fuss cutting out or die cutting out to make shapes too so you can't get around this one by making embellishments! Maybe you have a big stash of leftover alphabet stickers - how about using those as part of building a background? Maybe you have a big stash of old buttons or ribbons - filling a page with them would be amazing! How about that pack of ephemera that you 'can't see yourself using up'? Grab it and pour the whole pack on your page to see what you can come up with! You can use your plain and or coloured cardstock for photo matting and your background. Mixed media items, (paints, inks, stamping, pens, pastes, mists etc) count as embellishments in this too. Pocket cards I was umming and arrring over as it would be too easy to use them in place of patterned paper but they are great embellishments when using them as mats or journaling cards so I've decided to allow pocket cards BUT only four cards can be used! If you're making a pocket page it could be fun to think of different ways besides pocket cards to fill up your empty pockets?

I've dug up some visual ideas from Pinterest to kick start your own ideas.


Ready to get going?

Once you've finished your creation upload it to your platform of choice.
For Instagram tag @craftytemplates and mention it's for the Take It Away #4 Quirky Kit challenge so I can find it.
For Facebook add it to the Quirky Kits Group - they'll be a post for each new challenge there to share it to or else mention it's for the Take It Away challenge #4 when you post it so I can find it.
For blog add a link to your project from your blog in the comments below any of the Take It Away challenge posts, (like this one).
Or if you'd prefer to keep your project private you can email them directly to Leonora@craftytemplates.com

Have fun!
xx Leo


Lite Kit Layout & more stamping without stamps!

I've begun with the May/June Lite kit 'My Favourite Colour is Rainbow'. All the May/June kits have a rainbow colours theme and the Lite kit name is actually a quote from my mum who always claims her favourite colour to be 'rainbow'!

Here's my finished layout:

To begin with I wanted something to mat my photo too so picked out one of the squares on a paper from this Stay Sweet sheet and cut it out. I did need to trim my photo a bit to fit it.


I tucked a few of the flower embellishments from the kit under my photo and down one side:

Next I started to build up my layout by added a piece of the Jillibean Soup patterned paper, (yellow hearts) to the centre of a sheet of the white cardstock. I then cut out some of the tags from the bite sized bits Jillibean Soup paper and added them over the paper along with my photo piece.

I used some of the twine, (used to wrap your kit up with in your box) to create a 'wrap around' look. So the idea was I started with one end glued down to the cardstock background then threaded the twine through the holes in all the tag embellishments to work the whole way around the photo. Some of the tags I fixed down with 3D foam pads to give dimension.
Once I'd got back to the top I trimmed off the twine and tucked it under the large blue flower and added more glue to fix it down.

Following in the idea of stamping with no stamps, (it gets addictive once you start finding new things to stamp with!) I carved out a little squareish shape from the end of a pencil eraser to use as a background stamp. 

It's a fun way to just add a little finishing touch to a plain background.

There we have it all done. 
Super quick, fun and easy because everything, (bar the pencil and the ink) came in the kit so I wasn't spending ages faffing, (is that just a Yorkshire thing faffing? i.e procrastinating to the point of not getting anything productive done. It's another one of my mums sayings!) around looking for things to use.

xx Leo