Chalkboard Gift Tags

Hi!

Leo here. Are you doing your Christmas gift wrapping this weekend? Here's a fun quick idea to create some chalkboard look gift tags using goodies from the Five Gold Stars Quirky Embellishment kit.
You'll need some black cardstock, white embossing powder, (I used puffy white for a snow effect) a frame stamp, a embossing inkpad, (I used Versamark) a chalk pencil or piece of chalk for writing and some twine and any other embellishments you want to add to your tags.


Start off by cutting some pieces of black cardstock in to rectangles around 3x6 inches size. Stamp the frame stamp on the cardstock with the embossing ink then sprinkle on the embossing powder and heat with a heat gun to set.
Cut out the middle of the frame and cut the rest of the rectangle into a tag shape, cutting off the top corners and punching a hole for the twine.

 
Thread one of the wooden arrow embellishments on to the twine before threading it through the tag tops. Finish by adding a peg or other embellishment inside the cut out frame and write on the recipient with chalk pencil.

 
The chalkboard tags work great with any wrap you have and they're so easy to make and add that little personal touch to your wrapping.
 
Have fun!
 

UK Scrappers Christmas Blog Hop - Scrappy Gift Wrapping

Hi!

Hello if you're a new visitor to Quirky Kits blog coming over from UK Scrappers. This is the Quirky Kits blog where lots of ideas are shared using Quirky Kits and some general crafting ideas too.

It's Leo here today bringing you a fun Christmas idea to try out. I wanted to do a gift wrapping idea and I also set myself the challenge of sticking to just using left overs.
I started out with little scraps of patterned paper, scraps of ribbon and some recycled brown paper that was filling in a package. This is all very eco! You could use any of these ideas individually too in your crafting.

Gift wrapping paper

I've started out with a piece of brown paper that was in some packaging. You could use any other type of paper you like. Lining wallpaper makes a really good base for gift wrapping as well as regular parcel paper or even brown paper bags. If you wanted to make something really special you could use sheets of handmade style paper, (like mulberry paper) you can get from art and craft stores.

Start with your stamp collection and pick out some stamps you want to use to decorate your paper. I'm using some that are like vintage style postage stamps. I think they're by Whimsy Stamps. You could use anything you have that would work for Christmas wrapping. Something simple like a star or a heart or swirls or snowflakes etc. If you don't have any stamps at all a piece of foam cut into a circle would make a great polka dot pattern. To stamp the images I've used a Versamark inkpad as I'll be embossing the images too. To cover the large area quickly I've used my clear block to build up the stamps on then stamped them all together rather than individually. Try to keep your pattern of stamping random or work in a diamond pattern so one stamp at the top then two either side of it on the next row down then the next one underneath etc. That'll help you to keep them at regular intervals if you can't work by eye.

As it's special Christmas paper I've used some glitter embossing powder. I've tipped the powder into the middle of the brown paper and then swirled it around until all the stamped images are covered with the powder. I've then tipped the excess powder on to a loose sheet of paper then used that to tip the powder back in the jar.


Finally I've heat set the powder with a heat gun. Make sure you follow the manufacturers instructions on your stamping heat gun.

Making a scrap paper garland

To make the garland first I collected together lots of off cuts of Christmas papers, I tend to keep all my off cuts but you could also have some left over from making your December albums or Christmas cards. If you don't have any paper scraps this would also look really nice made with crepe paper or tissue paper pieces.
Once I'd collected together the paper pieces I cut them into widths, varying depending on how big each scrap was but non of them I cut larger than 2.5 inches or smaller than 1.5 so in between those two. Then I cut the widths into half inch strips on my paper trimmer so it was nice and quick and easy to do.

To fix the strips into a garland I've used some doublesided tape just pulling out the tape from the roll and pressing each strip onto it with the right side facing up, (so the tape is on the back of the garland) keeping it one continuous length. I've used a very strong sticky tape, (Ranger) so that non of the pieces will come off. If you didn't have double sided tape you could use a long strip of paper with some glue on it to do the same thing.
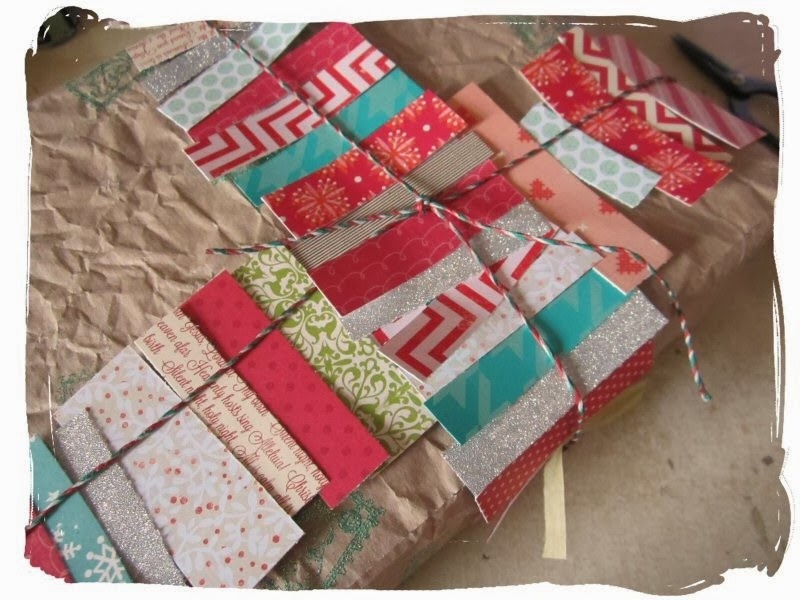

 Wrapping

 I've wrapped the gift with the decorated brown paper. To give you nice crisp edges and not see any sticky tape use doublesided tape to stick down the edges.

To add the garland to the gift start on the bottom side and peel the backing off the doublesided tape and then press the garland down while wrapping it around your gift. I've used two pieces around the middle and from top to bottom but you could just wrap it one way around if you preferred to use less.


Give the paper strips a little bit of dimension just by bending up the edges.


Next I've used some twine, (Lawn Fawn Mistletoe Lawn Trimmings, this was leftover from my Quirky Christmas kit) to wrap around the gift over the top of the garland.


I've added a gift tag to the twine using a mini peg.


Making a ribbon bow from a scrap of ribbon

To add a last finishing touch to my gift I've used another scrap from my stash, this time a piece of ribbon to make a bow. Usually you need quite a large length of ribbon to make a nice chunky bow when you tie it but this method not only gives you a nice neat bow but you can also get away with just using a small scrap of ribbon. You'll also need a needle and thread.

Fold both ends of the ribbon to the middle.
 Hold the ribbon in place.

Pick the ribbon up at the middle and pinch the two sides together. Use a needle and cotton to sew a few stitches to hold the two pinched sides together in the middle.


Pop up the ends of the bow to shape and you're done.


Add the finished bow to your gift securing it down with a glue dot on the back.


Finished project


Happy Christmas!
x Leo

Krafty Christmas

If you have any last minute Christmas cards or gift cards or tags to make I find it helps to pick out a colour scheme to stick to saving you time thinking about what to make. I added together the goodies from the September/October kits I had left over and added in some of the new kit goodies to see what I could put together. I decided on a kraft, cream, gold and silver colour scheme to make a few extra cards. With this colour scheme you could pair it with any simple paper to make some interesting gift tags too.


For all the card blanks I used Bazzill natural cardstock, (from Stitch in Time). To this card I used a piece of the star organza fabric, (from Daily Countdown) as a base. The holly leaves I hand cut out from paper, (Crate Paper Flea Market from Daily Countdown) and applied gold leaf to the edges, (Christmas Quirky Kit). The silver 'everyday' sticker is from the It's Been Lite kit and that has been added over the top of the fabric with the rest of the cards message stamped on scraps of kraft cardstock, (from Stitch in Time).


For this card I cut out a piece of Kraft cardstock into a tag shape to fit onto the front of the card, (all the cards are A6 size, (10cm x 14.5cm) to fit in standard C6 envelopes. The tag I decorated with a little spray ink and some of the Heidi Swapp stickers, (from It's Been Lite kit) and sequins, (from Sampler embellishment kit). The Twine I wrapped around the middle of the tag then tied in a knot at one end. It's fixed in place with machine stitching. The wooden arrow is from the Five Gold Stars embellishment kit.


Finally for this card I used an off cut piece of the Bazzill Natural cardstock then wrapped around some of the gold sparkle twine from the Five Gold Stars embellishment kit. The kraft doily is from the Sampler embellishment kit and that was added over the top. I then cut out a triangle of the Crate Paper Flea Market paper from the Daily Countdown kit and added that over the top using 3D foam pads to give it a bit of dimension. As a finishing touch I added the greeting stamped onto a scrap of Kraft card and one of the heart veneer shapes from the Homemade Quirky Kit Lite.

Dig around in your last kit leftovers and see what you can pair with the current kits to make up a new colour theme to use.
Have fun!
x Leo

Hints of gold and silver

Hi! Leo here.

All the kit boxes went out to subscribers last weeks so this week they should be arriving, or you should already have it with you from over the weekend.

With the November/December kits I wanted to do a couple of things. I sat out to as always reflect current trends as well as bring you up to the minute goodies and trying to reflect the time of year. Metallic was a trend I wanted to pick up on. I've seen this lots over the last couple of months. It's been used as both a main feature and a highlight on layouts and cards. For this time of year especially I thought it would work great paired with pale colours so you'll find that in your kit. Metallic colours also work well with high contrast colours like black. There's nothing like a black base to make a metallic colour pop so I've also included some black and darker colours. The metallic can be used for everyday themes and they'll work great for festive pages too.

In this layout I've had a go at using little hints of metallic and pale colours together.


From the main kit I used the Monochrome paper as the base then added strips of the Market and Merrymint papers at the top and bottom. Layers of the grey cardstock and Pink Paislee paper from the main kit I added as a cluster then added some pieces cut out from the Dear Lizzy paper from last month's Lite kit. 
I've added the metallic highlights using the Heidi Swapp stickers from the Lite kit, the silver sparkle twine from the main kit and the gold alphabet stickers from the main kit.


I've made this card using the Lite kit and used the black colours in the kit with the silver for a different look.


How are you planning to use metallic highlights on your projects? I'm starting to add some more ideas to the current kits Pinterest page which you can check out here, http://www.pinterest.com/craftytemplates/novemberdecember-2013-kits-inspiration/

I'll be back soon with another idea to make some hand cut titles and embellishments.

x Leo


Cut up kit cards

And with the few bits and bobs left from my Quirky Kits I have made some cards. They all also feature a Paper Smooches stamp set that I love for the phrases and the fonts.
This card has a cautionary tale attached to it. The aqua circles paper has the most gorgeous pink splattered paper on the other side. I must have grabbed that as soon as the kit arrived and thought "Yum, I must use that as a background to a layout" and so hid it away with the cardstock, to make sure I didn't cut it up to use. Where it remained until I was hunting for scraps to turn into cards. So i cut it up anyway. Pah. So this card features layers of die cuts (pre made and made by me) and papers. Outlined in black because it gives dimension and contrast and I love black.

 
This one layers two die-cut cards, some of that lovely big ricrac ribbon and a chipboard button with twine threaded through.
And my last attempt is slightly more masculine than all the pink and aqua
 More of yer actual backstitching, plus some wood pieces. I cut down the big wooden tag and rounded the corners. It took the ink pretty well. Those sweet wooden hearts are a nice finishing touch.

And that is it - hardly a scrap of the kits left. As usual I have had SUCH fun with all the goodies and can't wait for the next Quirky Kit to arrive :)


Fascinating Aida

because that is the name of the stitching material in the Sampler kit and I find embroidery fascinating. Well I did do a class in it for a while and have the equivalent of an AS level award for my work. Go me. Or rather not go me as I only really cross stitch these days!
Plus, it is a blatant excuse to link to a very funny song by the singing group of the same name.

In my sampler kit was a huge piece of Aida and I had the wild idea to try some embroidery on it and use it as the base of my layout. In the end when I was done I stuck it onto the cream cardstock from the kit, but it did kind of work
 I put the Aida on a frame in order to stitch the circles. After a bit of trial and error I found it was easiest to first punch a circle out of paper and pin it to the material; then stitch the edge of the circle and then fill in using long stitch. I tended to start in the middle and work out to the edges. 
I was most chuffed to note that the threads in the kit were a perfect match to the colours in my photo.

I managed to remember how to chain stitch for my title. I was glad that most of the letters had straight lines!
After sticking the aida to the cardstock I punched holes around the edge with a pokey stick and backstitched it all down. I added a few more stitches in order to secure that gorgeous crochet ribbon.

Quite a few of the embellishments look radically different from when they came out of the pizza box!
The long strip of paper down the left hand side was yellow but I needed more orange so swiped an orange gelato stick over it and made a colourwash with water. All the papers were given faux stitching around the edge.

The fabric buttons also had a colour change. I tried a few things but in the end the best colour again came from using gelatos and water. They needed a LOT of drying time.
The doily was one of the Maya Road kraft ones. I covered it in gesso and then painted it with blue watercolours
There was a time during the making of this layout where I thought I had only succeeded in creating a huge mess but I am glad I persisted as I am very pleased with how it has turned out. Maybe I will go back to really loving embroidery again!