Patterns Challenge Week 2

Hi Leo here!
Here are the details for the second of the new weekly challenges. The latest challenge is called Patterns.
The new challenges will focus on a different pattern every week. You might want to interpret them literally and raid your patterned paper stash but we'll also be looking at ways to use pattern as the main embellishing element on your page.

How it works:
I'll post up details of each new challenge every week, (this being challenge number 2 of 4). Each new challenge will be posted here on the blog and also in the Facebook Group for you to follow along with.
Complete all the Pattern weekly challenges to be eligible for an extra goody in your next kit box! The closing date to complete all four of your Pattern challenge projects will be 20th September 2019. All projects must be new projects made specifically for this challenge. You can use any stash you choose but it's a great opportunity to dig into your kit box and not leave it unused!
Ready to see the second challenge?
For the second challenge the pattern focus is:
Stripes
So you can take this literally and head into your stash to pick out striped patterned papers to use. Or you might want to think a little more about ways you can incorporate stripes in a different way.
If you need ideas I've dug these up from Pinterest to help to kick start your mojo:


How about creating a fun rainbow of stripes and like these they don't have to be in a straight line!

A subtle way to use stripes as a patterned paper background with an overlay of white cardstock.

A different kind of stripe pattern - a simple thin diagonal stripe on this paper - something similar could be recreated in pen lines or even stitching?

Simple stripes of cut out patterned papers but all in one colour tone against a contrasting colour background.

These are washi tapes made into a striped background. If you have a large stash of washi tapes this could be a good way to get some of them used!

If you're not a fan of using multiple colours how about going for an elegant black and white stripe?

Here strips of patterned paper have been mixed with stipes of dry brushed acrylic paint to create the background. 

Another different stripe using cut out strips of paper made to look like brushed on paints. 

This one has a mix up of stripes made with washi tape, paint, stamping, patterned paper and fabric trims.

These paper stripes have star cut on one end.

A simple striped patterned paper has been used here along with little strips of stitched sequin accents.

Another washi tape stripe background but this time on a darker cardstock.

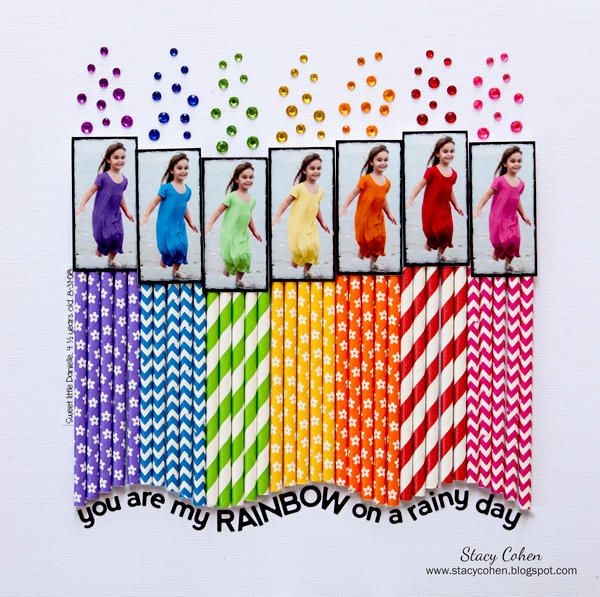
This one is super fun and uses paper straws in s striped pattern. You can create your own paper straws using rolled up patterned paper off cuts.

Ready to get going with your own layout?
Once you've finished your creation upload it to your platform of choice.
For Instagram tag @craftytemplates and mention it's for the Patterns #2 Quirky Kit challenge so I can find it.
For Facebook add it to the Quirky Kits Group - they'll be a post for each new challenge there to share it to or else mention it's for the Patterns challenge #2 when you post it so I can find it.
For blog add a link to your project from your blog in the comments below any of the Patterns challenge posts, (like this one).
Or if you'd prefer to keep your project private you can email them directly to Leonora@craftytemplates.com
Have fun!
xx Leo

New Weekly Challenge - Patterns

Hi Leo here, happy new kit time!
Here are the details for the first of the new weekly challenges. The new challenge is called:
Patterns
The new challenges will focus on a different pattern every week. You might want to interpret them literally and raid your patterned paper stash but we'll also be looking at ways to use pattern as the main embellishing element on your page.

How it works:
I'll post up details of each new challenge every week over the next five weeks, (this being challenge number 1). Each new challenge will be posted here on the blog and also in the Facebook Group for you to follow along with.
Complete all the Pattern weekly challenges to be eligible for an extra goody in your next kit box! The closing date to complete all four of your Patterns challenge projects will be 20th September 2019. All projects must be new projects made specifically for this challenge. You can use any stash you choose but it's a great opportunity to dig into your kit box and not leave it unused!

Ready to see the first challenge?
For the first challenge the pattern focus is:
Spots and Dots
So you can take this literally and head into your stash to pick out spotty/dotty patterned papers to use. Or you might want to think a little more about ways you can incorporate spots/dots in a different way. How about creating a spotty pattern on your background using cut out circles of papers? How about cutting up your photo/s into circles? It could be that you hunt out all your spotty or circular shaped embellishments?
If you need more ideas I've dug these up from Pinterest to help to kick start your mojo:

Lots of different sized cut out spots of paper in this one and mixing in enamel dot stickers too.


Love how the photos on this one have been added to the spots of paper and the spots being in a polka dot pattern. Would be a great way to tell the story of a day trip! Note the use of buttons too - these are fab for creating spotty patterns.

This one is a neater version of creating a spotty cut out background with the cut out circles in lines.


Both these layouts, (above and below) use a spotty patterned paper as their background.


This one uses both spotty papers and a spotty cut out design!


Ready to get going with your own layout?
Once you've finished your creation upload it to your platform of choice.
For Instagram tag @craftytemplates and mention it's for the Patterns #1 Quirky Kit challenge so I can find it.
For Facebook add it to the Quirky Kits Group - they'll be a post for each new challenge there to share it to or else mention it's for the Patterns challenge #1 when you post it so I can find it.
For blog add a link to your project from your blog in the comments below any of the Patterns challenge posts, (like this one).
Or if you'd prefer to keep your project private you can email them directly to Leonora@craftytemplates.com
Have fun!
xx Leo


Summer Vibes - Natalie

Hi everyone, I'm back with another summery layout to inspire you today!


Supplies used:

Main Kit:
- Amy Tangerine Stay Sweet - Summer Slices A and B sides
- Amy Tangerine Stay Sweet - Popsicle Summer A and B sides
- White cardstock

Extras Shop:
- Amy Tangerine Foam Phrase and Icon Thickers

Own Stash:
- Circular cut file.
- Puffy sticker.

For this layout I wanted to focus on using several patterns on one layout. I searched for a summery photo and found this selfie taken on a recent trip to Brighton.

I remembered I had this pre-cut circular cut file in my stash from years ago, and I thought the bubble/ circular pattern would be perfect for a summery beach layout.

I backed it with the 2 Amy Tangerine papers, both the A and B sides, trying to evenly distribute the patterns across the layout. At first I thought it might be too busy, but actually I think they all work perfectly together!


I used a foam phrase thicker from the Extras shop for my title, which draws in all the colours of the papers. And I added a small co-ordinating puffy sticker from my stash.


I then thought about my journalling. I initially was going to add typed journalling strips on white cardstock, to two of the circles, but after trialling it, I felt it made the page far too busy. So I decided to use a technique that I've done before, which is journalling around the edge.

I used a grey Graphik line maker pen with a width of 0.1mm, which Shimelle recommended once as the best grey pen. I think it's perfect for adding a lot of journalling to a layout, but without the need for heavy black ink.


After doing my journalling I thought about adding more embellishments, but I decided I actually really liked the layout as it was. The cut file and papers are so busy that extra embellishments really aren't needed.


I hope this layout has inspired you to use up your patterned papers!

Natalie x