Autumn Journal Class - pumpkin prompt pages & next prompt

Hi!

The next prompt in the class is 'Pumpkin'. Again how you use this as the base for your page is totally up to you. It could be in the photos you use, the subject or the bits and pieces you pick out to use.
I went with pumpkin carving photos and here's one of my pumpkins this year. I went with some really cute diddy ones, (weirdly I got more pumpkin out of these little ones that the bigger ones, more on that in later pages and how I spent four hours on Sunday cooking with Pumpkin!).


Here's my page following along with the prompt 'Pumpkin'.


The left side was dictated by the four pocket page protector used on the previous page so I picked out some cards to use again and fixed those to the back of the cards in the pockets already. The top right pocket is paper from the main kit cut down to size and the wooden star from the main kit is glued on top of the page protector and stamped with a date stamp.


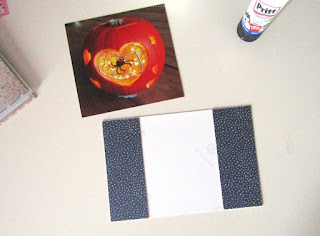
For the opposite page I added my photos to two 4x6 pockets on the page protector. The top photo was printed to size, (4x6) and the lower photo was a square so I added some extra patterned paper down the sides.

I had a paper scrap to use from the page before it so I cut it in half and used two strips of it down the sides to make it up to the 6x4 size. I used this same blue dotty pattern paper to keep the flow of the pages going.

 
That's what the back looks like with the strips glued down the sides of the photo.

Next I added the alpha stickers over the top of the page protector as in the previous page. To line them up I used the card backing from the alpha pack lined up with the edge of the page protector to make a straight edge. To get the spacing right I put down the first and last letters to begin with then filled the rest in the middle.

Same with the smaller alpha stickers.


As a final touch I added some of the Pinkfresh puffy stickers around this side and the other to help tie them both together.
That's it - page done!

I'll leave you with the next page prompt and it's....

Spooky Stuff


So what are you thinking? Halloween costumes, maybe something you're afraid of, something that's creeped you out lately or anything else you can think of! I'll be back in a couple of days to share what I put together for this next prompt.
xx Leo
 

She's a Wildflower!

Hello everyone! New month, new kit and under 10 weeks until Christmas can you believe?
But less talk about the C word for now lol, here is my first layout using the September/October kit, what I used and how I created it, Enjoy x

From the Main Kit:
  • Dear Lizzy Stargazer Blissful 12x12 paper
  • Yellow and Blue 12x12 cardstock
  • Pink Paislee Turn the Page #15 12x12 paper
  • Pink Paislee Turn the Page #1 12x12 paper
  • Dear Lizzy Stargazer sticker sheet
  • Pink Paislee Turn the Page wood veneer
From my own stash:
  • A piece of orange patterned paper from my scraps bin
Here's my layout, and how I created it


  First off I started by cutting a 5 inch strip of the Blissful 12x12 paper from the Stargazer collection, and then cut a half inch strip of it, along with a half inch strip of the yellow and blue cardstocks that came with the main kit. I also cut a two inch piece of the blue cardstock for the left hand side of my layout to balance it all.

  I chose the placement of my photograph and backed it onto a piece of orange patterned paper from my scraps bin, along with a thin strip of the same paper so the blue block on the left didn't look too heavy.

  I then decided where I wanted my title and journalling to go before starting my embellishing.
  A couple of weeks ago I went on a scrapbook crop weekend to a hotel with fellow design team member, and now friend, Natalie Weller, and I observed her process when she creates layouts, as I find myself doing the same thing a lot of the time without even realising so it was good to learn some tips and tricks from her...Thanks Nat :D

  Natalie's embellishment clusters work in a triangular format and so your eyes follow that and (I found) the eyes are drawn to the focal image, which is your photograph and then the journalling to see what the photograph is about.

  So starting with my first embellishment cluster on the top left hand of the page. I fussy cut the banner from the Turn the Page cut-apart sheet, and the flowers from the Pink Paislee #1 paper. I layered the banner on the rest of the orange scrap paper and mounted it with some foam tape for dimension. I used two pieces of the Turn the Page wood veneer pack, and a star sticker from the Stargazer sticker sheet.


  The second embellishment cluster is on the top right hand side of my photograph, and I wanted to carry the same theme throughout so it flowed better, and I love the results.


  So again I used some of the fussy cut flowers, two wood veneer pieces and a start from the sticker sheet. I sometime struggle to use wood veneer on my pages, but this pack from the Turn the Page collection just works so well with my theme and there was some lovely small pieces which are always good... happy Zoe!

 The final cluster on the bottom left (thus completing the triangle) has my title She's a Wild Flower sticker, the sentiment banner and star all from the stargazer sticker sheet. as well as a wood veneer arrow pointing up to my journalling, which, for my 2017 album is all going to be done on the computer. It's a new system I'm trying out to see if I like it...


  BUT that aside TADA!! Layout complete. I will now be taking longer to think about how I approach my layouts and where I want to lead the eyes. I loved this format!
  Stayed tuned as I have two more layouts winging they're way onto the blog over the weekend.
  If you've tried out any new techniques lately, please feel free to share them on the facebook group, I would love to see them and I'm sure everyone else would too.
  For now, Happy Scrapping everyone!!! xxx

Autumn Journal - more pages and the next prompt!

Hi!

Here's the next page in the autumn journal I'm making. It's really fun to use this to play along with techniques I'm thinking of putting into my December Daily this year or it's kind of getting me to think of different ways to use the pocket pages anyway. For my next page I used the last prompt 'Leafy Layers'.
 
Here are the things I picked out to use. I went with a full page pocket page protector and a 4 pocket page protector, (3x4 size pockets). I used papers from the main kit cut to pocket size and some pocket cards from the custom card kit. I also used a foam word sticker from my stash, (this is from the stuff I picked out at the beginning of the Journal class from my stash it was in the Sept/Oct Lite kit last year) and I'm using alphas from the main and Custom Card kits. The leaves are from the Lite kit.

 
For the leafy layers bit of the prompt I decided to fill the pocket page protector with some cut out leaf shapes. They make a fun kind of 'moving' page.

 
To add my photo I slid it inside the page protector and then secured it in place, (round about the middle of the page protector) with a mini staple.

 
Next I wanted to add the title right on top of the page protector. This is where I love foam stickers as they stick really well to plastic! The wood alphas surprised me I thought they'd need extra glue but they stuck well too!

 
I added a few foam stars from the same foam sticker sheet I used for the 'the' part of my title.

 
For the page on the opposite side I cut out a piece of the 'Marigold Merriment' Star Gazer paper to pocket size, (7.5x10cm) and mixed it with cards from the Custom Card kit.


I designed this card with a space to add a date stamp so I diligently did that bit!

 
For this card I cut out the Pinkfresh Studio Wander piece of paper and added the 'remember' label from the Custom Card kit with a mini staple. The journalling card has had my journalling printed on it. I used the same process as in part one of the class but this time I put the journalling card on the paper before printing the sheet again so it printed over the top of the card.

 
Finally I added some Pinkfresh Studio puffy stickers to the blue card.

 
Put the whole thing in my journal and done!
 
 
OK if you're done with the first two prompts as I am them the next prompt for you is....

PUMPKIN

This could refer to someone you love, (like a cute pet name nawww) it could be something to do with a pumpkin, maybe a recipe and of course it could be all about the pumpkin carving. With Halloween coming up next week it's that time of the year!
Have fun with the next prompt. I'll come back in a couple of days to share what I made for this next prompt.
 
xx Leo
 

Autumn Journal - How I've made my mini album

Hi!

Here's a look into the construction of my Autumn Journal mini album. To start off with I gathered together things I'd be using and I'll also be pulling out bits and pieces as I go along. I'm primarily using the 'Crisp Air' Quirky Kit main and the 'Traditions' Custom Card Quirky Kit. Because I have so little that hasn't come from a Quirky Kit in my stash then 99% of the other things I'm using are all from past kits. I just pulled out bits I thought would work well. It's mainly leafy bits and my favourite polka dots and lots of kraft and black/white which will go with anything!

 
For the cover I've used some greyboard that's just recycled packaging. You could use anything that's sturdy for a minibook cover. If you didn't have anything else the cardboard from your kit pizza box packaging would work just as well.
 
 
Here's the front cover, covered!
 
I just added a little embellishment to start off with, more may get added once I'm finished and I can see what's left to use! A puffy sticker from the Pinkfresh Escape the Ordinary collection pack, (there was a pack in the embellishment kit and it was in the extras shop). The tag is from the custom card kit as are the little wooden bits. I stamped the title with a roller alphabet stamp.
 
 
Inside I'm using 6x8 page protectors. I have a whole bunch left over from December Daily last year. I bought one of those 100 variety packs and I have about 60 left so I pulled out about 20 to use here. It's just what I have in my stash if you don't have them but have loads of patterned paper sheets or plain card sheets use those as your pages. You could even do a mix up so you mix in just a few page protector pages and do others cardstock. I don't always use pocket pages in the traditional way so don't think this is going to be 'stick a card in a pocket' album! To fix the whole thing together I'm just using bookrings.

Here's the back cover. It's the same chipboard but covered with one of the other main kit papers.
 
On the inside I have a transparency with one of the Star Gazer stickers from the main kit, (the transparency sheet was in an older main Quirky Kit, I think it was April 2014?).
 
 
Then as it'll be split across two months, (Oct/Nov) I've done a title page with October. This was made with a piece of cardstock, (old Jan/Feb main kit) and one of the custom cards with one of the tags from the custom card kit stapled to it. I just got a Rexel Bambi mini stapler and I'm a little addicted to adding mini staples to everything! I coloured in the staples orange with a Promarker before I used them.
 
 
Here's my first page. The first prompt was 'Orange'. I used a photo of the orange roses that have started to flower again in the crazy for October warm weather we're having. The page protector has 2 4x6 pockets. I used the bottom one for the journalling, (pieces of paper + a tag layered together). The top pocket I've made into a shaker pocket by filling it with some of the sequins from the main kit and one of the wooden shapes then stitching with my sewing machine in a rectangle over the pocket to seal them inside. The photo I added to a tag from the main kit and I've attached it over the top of the page protector with a mini staple. A couple of the Pinkfresh Studio puffy stickers add a little more embellishment and there's a little bit of washi tape from an older embellishment kit, (June this year one).
 
I made the journalling strips on my home printer. This is how I make mine - it might not work in your printer - all printers are so temperamental, (mine is from one day to the next!).
First I printed it on regular paper just using Word and leaving a big space at the top of the page then double spacing each line. You can check that it's the right size for you page too. The font I'm using is A type writer for me.
 
 
Then I glue on a scrap of white card over the top using a few dots of glue stick, not loads of it just enough to stick it to the paper, usually two or three dots. Let it dry.
 
 
Then it does back in the printer, (mine needs to go upside down as it rolls upwards, your printer may be different so figure out how it rolls up the paper first) and print the same page again so it prints over the top of the card. I always pick the 'best' printing option just to slow down how it feeds into the printer as if it goes at it's usual crazy pace it can rip off the card piece.

 
Hope this has inspired you to start creating your own Autumn Journal! There'll be at least two new prompts a week and I'll keep sharing what I'm making. If you sign up to the class newsletter you'll get sent everything to your email inbox too so you can keep all the prompts and ideas together:https://quirkykits.blogspot.co.uk/2017/10/autumn-journal-class.html
 
The next prompt should be in the last blog post it's 'Leafy Layers'. I'm just starting my page now so will pop back once it's finished to share. x Leo


Autumn Journal Prompt 2 - Leafy Layers

Hi!

I have another Autumn Journal prompt today. My book has it's bare bones finished so I'll share it once I'm done posting up this next prompt. It's been difficult to get some nice bright weather to take some photos, the gloomy all day rain has finally kicked in here!

OK so your next prompt is, Leafy Layers.
Again how you interpret the prompt is up to you. It could be in a what you use to create your page/project or how it's used or it could be a photo prompt. Perhaps the classic Autumn shot of kicking the piles of leaves!

Here are some things I've dug up from around the web to get your inspiration flowing a little bit more:

Have fun!

Autumn Journal - Prompt 1 'Orange'

Hi Leo here!

Here's your first Autumn Journal prompt.

Orange

It's the colour of the season and seems to pop up everywhere from Halloween pumpkins to turning leaves. As you go through your day take time to look for something orange. It could be anything at all, take a quick snapshot if you can and document a page about the reasons for your choice or just about your feelings on the day or anything you want to relate to the photo. Alternatively you could use the prompt as a starting point for a photo you have already and base your page/project on the colour orange in the way of the supplies you use.

Here are some photos to inspire you and I'll pop back to share my first page. xx

https://www.pinterest.co.uk/pin/AeIp2H7NaP2DAsjzb5DSMZkhFCVa4Kpey9ZKncRzaIoV3Pp3dFn2VwI/https://www.pinterest.co.uk/pin/518125132114316899/https://www.pinterest.com/pin/339177415664460301/https://www.pinterest.co.uk/pin/28710516349171112/
 

Autumn Journal Class


Hi!

Beginning on the 15th October through to 15th November I'll be sharing a series of Autumn theme prompts, (starting points) for creating pages and projects. You can choose how you'd like to interpret them. It could be in scrapbook page form or making a mini book or journal or just incorporate it into your regular Project Life style book. The prompts will be about celebrating the Autumn and the everyday so you get a record of this fleeting season before the madness of Christmas comes upon us!

If you'd like to sign up to the mailing list you'll get your prompts sent out to you or you can follow along here on the blog.


The first prompt will be posted on Sunday 15th October. There are no specific supplies you'll need as the idea of the prompts is to be a starting point for your personal choices but if you want to create a separate mini book or journal following the prompts you could pick out something to use at this stage so it's ready for you to fill. I'll be using a mix of 6x8 page protectors and sheets of plain card fixed together when I'm done with bookrings. It's basically a mishmash of things I have leftover from other projects. It could be that you have a sketchbook or notebook to fill or you could use an old book and alter it or use a mini album or just make pages as you normally would to add to your scrapbook. If you have something in mind you'll know it but if not then don't worry too much you can go with the flow once we start.

See you on Sunday!
xx Leo