A Simple Recipe

Hi Leo here!

I made a layout for Simple Recipes over on UK Scrappers using bits from the new kits so I'm doing a little more of an 'in depth' look at some of the ideas I used making the layout.


The background of the layout is built up with four patterned papers. It kind of looks like four papers layered on top of each other but each of the upper strip are just 2 inches wide and they're graduated and stuck together on the back with doublesided tape.


If you use doublesided tape you can use it to stick the layers of paper together first then when you're happy you can peel the backing off and use the same tape to fix it down to your cardstock.


The last layer is the largest, it's the size of the rest of the sheet minus the size of the top strips you want to showing. It's a nice easy way to get the effect of lots of layers of paper without use up your whole sheets.


The next technique involved creating recipe cards stamping with rubber bands.
To start with use a wide band and wrap it around a clear stamping block. Ink the band up well, I used a chalk ink as it had lots of pigment in it so it was easy to get a good impression from.


Line up the band with the edges of your cut out piece of card and stamp around the edge. This is a 6x4 inch stamp block I'm using so I cut out the card to 6x4 inches too. Obviously you can make it smaller but it's much easier to do one line rather than try to match up the lines so I wouldn't go larger than the stamp block size you have.

Narrow rubber bands are good for stamping lines. You can use these for any kind of journalling card, doesn't have to be a recipe card.


Here's a finished recipe card where I've mixed the wide and narrow rubber band stamping. Because you're stamping rather than printing with this idea you can experiment with what types and colours of ink you're using and even try embossing so you can create metallic gold or silver ones or glittery ones with the glitter embossing powders you can get. 


Another thing I did is use one of the Teresa Collins vellum stickers to make a glittery title. When I went to use these I discovered just how sticky they are! Really sticky so that got me thinking of using something like glitter on the back. It was just a case of sprinkling the glitter of the back of the sticker and it was sticky enough to cover the whole surface. I don't have micro beads to try but I'm sure something like that would have worked too. There are other things I want to try too like gold/silver leaf, any of those kinds of gilding flakes or foils could be good!


I'll be back with more soon. I'm working on a series of blog posts about planner making with your existing scrapping supplies. I've really been determined to do something without spending more money so my base for my planner is a trimmed down ring binder I wasn't using anymore. I'll let you know more as I get to properly start it. I have set up a planner making Pinterest board here where I can put ideas and cool printables as I see them.

x Leo

The new Quirky Kits run through part 2!

Continuing the run through of the new kits the next one is the new Lite kit 'Carrot Cake Muffin'. Carrying on the kit theme too, (and to get your inspiration going for Baking week this month!) here's a recipe for carrot cake muffins, http://www.bbcgoodfood.com/recipes/470640/carrot-and-cream-cheese-cupcakes
I use carrot cake recipes and substitute the carrot with pumpkin to make pumpkin cake too, adding a little bit of nutmeg to the icing instead of cinnamon or vanilla really works with pumpkin cake too.
OK onto the kit!
In the embellishment bag are these fun quirky note cards in cloud shapes. You can use these for journalling or just as embellishments to highlight a title.


Prima Coffee Break flowers. 


And some super cute mini envelopes from Jillibean Soup. Again these are good for adding journalling inside, (maybe on a tag) or to use as a layer. The little size makes them good as embellishments on cards too.


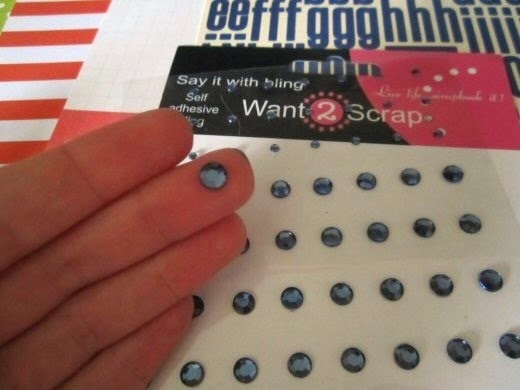
More embellishments in the kit include a pack of navy coloured bling stickers,


and a cardstock alphabet sticker sheet.


You also get some coloured raffia, this is another May Arts trim. You can use it on cards or home decor projects or my personal favourite would be to use it in gift wrapping. It's a little touch of rustic that works well in Autumn.


In the papers with this being the Lite kit I've picked out a paper with cards on so if you want to you can use the paper as an extra sheet of embellishments. The jewel tones of this Echo Park one work really well for Autumn I especially liked the top three cards on the sheet.


The other papers are all jewel toned too. We've got a new manufacuter to try this month in Chickaniddy Crafts paper. I liked the deep orange colour of the stripe paper and it's a good on for Halloween or Autumn or everyday.


If you're not feeling the brighter colours I also made sure the other sides had a subtler look so you can flip them to get a different feel.


This kit like the main also has a hint of mint and navy which has been a key inspiration for the kits this month. Mixing just the subtler tones in the kit gives you a different look again.


Next we have the Embellishment kit 'Marshmallow Dream Bar' There are a few different recipes for Marshmallow Dream Bars I found online. Lots of them involve chocolate and Rice Krispies. They're also Rice Krispie treats, the kind with the marshmallow. With it being half term this month I did think this could be something fun to do with little ones so I've picked out two recipes for Marshmallow Dream Bars this one, http://www.sheknows.com/food-and-recipes/articles/1027417/copycat-starbucks-marshmallow-dream-bars-recipe and then for adults how about this one, http://www.cupcakediariesblog.com/2010/10/marshmallow-dream-bars.html#_a5y_p=1890508 which is basically a brownie recipe with melted marshmallows on top and then an icing similar to a chocolate fudge cake one. I've not made the second recipe but reading it I think I'd have to put some strong dark coffee in the icing, (along with the cocoa) or use some real dark chocolate in the brownie base just to make it not as sweet with all that marshmallow but still chocolately! Let me know if you have an experiment with the recipe. 

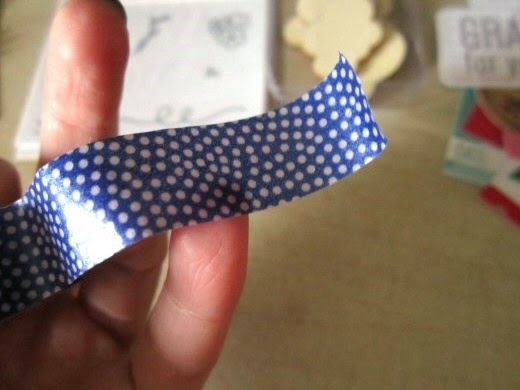
On to the kit. One of the first things I picked out for the kit was this lovely washi tape from Love My Tapes. It's sold as navy but for me this is more of an indigo colour, it's lovely and it set me off looking for slightly brighter colours in the embellishment kit but still using the inspiration of the jewel tones.

These little Prima Coffee Break stickers are a bonus for you, they weren't meant to go in but I just couldn't resist them!


These little clouds are by Maya Road. I've put a half pack in per kit just because they were all the same design repeated four times so I figured that was too many of the same thing. Wooden embellishments are great for adding a rustic element but you can also ink them or paint them to give them a look you want. How about making them all grey and black for a Halloween project!


The Elle's Studio Sycamore Lane line is adorable but there were quite a few of the things very 'US' with thanksgiving and fall themes so I picked out the Little Bits and Pieces embellishment packs for kits as they have great universal sayings and look Autumn!


These chipboard stickers from MAMBI are really fun too. I loved all the different fonts and the addition of the colour to the chalkboard just lifts the look.


The mint hint is here in the embellishment kit in the form of these yummy gems from Kaisercraft. If you're lucky enough to have the Lite and embellishment kits you have to mix your navy and mint gems embellishments together for at least one project, lush!


These vellum stickers I thought were interesting too, they don't go quite clear they take on the colour of what you stick them to. 


You also get a pack of buttons from Fancy Pants. Some are chipboard and some are resin and they have foam dots so you can use them as a quick stick embellishment or sew them on like buttons. You may also notice if you have a main or Lite kit some of these colours and patterns are in your papers too!


Last but not least are these amazing metal flower embellishment packs from Prima. I absolutely love these, they so remind me of 1950's/60's brooches. I also like how they're some that are flat so you can use them on scrapbook pages.


Even the ones that have a bit of dimention you can squish down to make them flatter.


You can also stack them up and mix them with the resin ones to make 'jewellery' style embellishments that would be brilliant for cards or home decor. I'm so going to use some of these to make jewellery!


OK hope you enjoyed the little kit run throughs! I'll be back with my first layout for you on Sunday. Don't forget to check out the Pinterest Boards for inspiration too, http://www.pinterest.com/craftytemplates/ I just started a new board for planner inspiration. I'm in the process of making a planner type project using scrap supplies which I'll share when it's a bit more finished. I've used an A5 ring binder as the base for it and it's just a case of chopping and clipping in so far!
x Leo

New Kit Time, let's take a look and print off some printables!

Hi!
It's new kit time and subscribers, your kits are winging their way to you right now if they've not turned up already. Single purchase kits will be available soon from the shop, I'm waiting on restocks of a couple of the kit items to finish off a couple more of each kit.

I've done a little run down of the new kits and there's also some digital downloads along the way for you too.
The main kit this time is 'Blueberry Scone'. All the kits this time are named after recipes, (it's national baking week this month!) so for starters check out a recipe for blueberry scone. You've probably got your own favorite scone recipe so you can also just use that and add blueberries too.

These are really cute they're brand new from Chickaniddy Crafts. Lots of these shaped enamel stickers are popping up right now in new collections. I liked the simplicity of these, you can use them on any theme layout or on birthday cards etc. Even Christmas if you wanted to hoard them for your Christmas stash!

There are also a pack of Flair embellishments from Echo Park. The colours also match with the enamel stars so you can mix them up together to make cool clusters of embellishments.


There are some little bits and pieces to add texture to projects too. There's some tulle ribbon, this one's from May Arts. It's a soft one not that stiff dress stuff so it's nice and easy to manipulate into flowers or just use it as a layer to add a different texture alongside your papers.


The hessian you can cut up into shapes to use as embellishments. This again could be something to add to your Christmas stash too as it's an unusual metallic colour. It'd make a lovely homemade tree decoration if you like your sewing.


The alphabets in the kit also add a bit of texture with the glitter surface.


The papers I've put this way around as the 'A sides' in all the kit pictures and for packing. I just loved that colour combination of the minty green, navy's and oranges/browns.


If you're not feeling that colour combo though and want something brighter the flip sides give you a different choice. All the papers mix and match with each other and the embellishments so you can make something completely different.


The We R Memory Keepers It Factor paper really made me think of bonfire night and fireworks exploding so I think it should be a good one to use to record those moments coming up over the next few weeks!


There are more little embellishment bits and pieces. I loved the colours in both the new Teresa Collins lines 'Life Emporium' and 'Nine & Co' so I've mixed up both of the sequins from those collections and given you a whole bunch of them to play with! You also have some really cute little  wooden shapes to use in a tree and a pumpkin, if you do pocket scrapbooking one of these inside a stitched down pocket with a few of the sequins would be super cute!


My favourite of the sequins are the pastel colour ones, I've not see any this colour before:


The custom cut outs are a new thing for this month so let me know if you're liking those.
The little bag of goodies have a mix up of buttons, bows and a charm in copper and navy. These are a little bit more sophisticated looking I think, just to give you a different option again to create another look with your kit.


This month there were digital downloads too in the extras shop. I wanted to try and make a paper version of a skeleton leaf, these are from the leaf and tree set. I've cut them out with the Silhouette machine. If you want to have a play around with one I've put one for you to download from here. Or you can use the image bellow. Just save it to your computer, drag and drop it into Silhouette Studio, use the trace function to make your cut lines and then send to Silhouette. All the working out bit is already done, (by me with hours of head scratching!) so they trace really easily without you having change any of the settings.


I also made some labels for you to download all the colours will match any of the kits. You can cut them out by hand or again if you've got a Silhouette you can use the Print and Cut option which is what I did for these ones. They're printed out to 4x6 size here but you can go larger or smaller depending on how you want to use them.
Download the labels here or use the image bellow.


I'm going to have to pop back tomorrow with the other two kits run thoughs. I do just want to share one more thing though for you to download. It's a cute little print and cut out for you to keep with your kit. I'm just starting to get into making a smash book planner kind of thing and I did think this would be really cute in a planner or a smash book if you punched some holes on the edge. You could even have it as a poster up in your crafty space or pop it in your kit bag. It's got loads of ideas and photo prompts for you to give you a few ideas and starting points. You can download it here or print it from the image bellow. Make sure you click on it to get the proper large image size.


OK I'll be back tomorrow with the other kit run throughs!
x Leo

A bit dotty

 I knew that I wanted to have a central circle feature on my layout so made a circle template and painted some gesso through it.

I also wanted to challenge myself in the use of the mist in the kit. So firstly I painted some onto some of the patterned paper. Then once the gesso circle was dry I also painted with the mist through the stencil.
And THAT went rather horribly wrong.
I think it would have been better if I had mixed up either some gesso or even better a little texture paste to make it less runny as the mist did go to places it was not supposed to.
Which is why there is all the black pen work - to give some definition to the splodge and then to balance it with everything else.

I then layered up the papers and tags on the right hand side, stuck down some punched circles, then added the title and the two lots of journalling.
And THAT was the second mistake.
I so wish I had put the Bible quote on the top part of the circle rather than on the camera. It looked so out of balance.
So I decided to fill in the top half of the circle with lots of the tiny embellishments in the kits, also scattering them amongst the circles.
The finishing touch was more of the rub ons. I do adore the way that you can cut bits out and make your own phrases.