Spring in Your Step Ideas To Try

Hi

How are you getting on with your kit this month? Sarah has given us some fantastic ideas over the last couple of weeks. I've got a few more ideas to share over the next week. I'm going to begin today with a couple of layouts. Later we've got ideas for leftovers, photo ideas and just before the Royal wedding celebrations next week I've got some fun tea party projects including a pretty rose cupcake recipe and 'royal wedding fasinators' in place of party hats so save some of your tulle, union jack flags and grab your store cupboard ingredients (you'll need all the usual stuff flour/butter/eggs/sugar plus red food colour and rose syrup or vanilla flavouring if you don't like rose syrup, it tastes like rose turkish delight). I'll add more info about ingredients you might want to gather next week.

So back to today and layouts. I've got some suggestions of elements/ideas you can have a play around with.
Layout 1


Painted edges - Use layers of acrylic paints on the edges of your page and along the edges of your paper pieces and/or photos. Layer different colours, (here I've used yellow and gold) and use white for a distressed look. Use a dry brush so you don't curl your paper - the wetter the paper the more it will curl as it dries so always use paint sparingly with a dry brush.

Build up layers. Mix paper layers with fabric and tulle to create texture, don't worry too much about covering up just keep layering up!

Use off cuts of patterned paper to decorate your background, cut them into smaller pieces or use small off cuts if you have them and add them to your page background to create a sense of depth and add interest.

Layout 2


Use hand written journalling and hand drawn elements.

Use hand cut embellishments, you can sketch them out on paper first and then cut them out or hand cut them directly.

Layer up punched elements for a 3D effect, these also make use of paper scraps.

Here's a sketch to work from based on the second layout:


Next time I've got some neat ideas for using up more small leftover bits and pieces, there's a small little peek bellow and I'll be sharing a fun photo idea you can get the family involved in.


Speaking of small peeks, would you like to see my finished board for the July/August Quirky Kit 'The Milk Bar'?

'The Milk Bar' was one of my favourite places to go get sundaes when I was little. We used to get the most amazing milk floats, (cola, lemon or limeade with ice cream) and Knickerbocker glories from there it was pure summer bliss! It also had the most amazing 50's kitsch decor and this is in the early 90's late 80's when retro wasn't very in (more power suits, shell suits and bad perms lol) so that fun 50's kitsch really made an impression and it's still one of my favourite styles today. So thinking of summers past was the starting point for this, the colours, the feeling, the sunshine, {the rain!}. I've mixed soft candy colours with neutrals like tea dye and linen. I've also added lots of journalling inspired bits and pieces so this would make a great travel journal or a journal of any other kind of adventure! The neutrals will work to balance out all the prettier stuff too making it great for everyday scrapbooking or card making.

Young at heart still

Sarah Here, with this weeks inspiration. This is my last LO using the kit but join me again next week when i will be showing you a couple of projects made with the left overs.

So back to this week. The cycle themed paper just screamed Daniel, my eldest son to me as he is sooooo into his bikes at the moment and more than happy to play in the garden practising his moves as he calls them, lol.


All materials from the kit except alphabets title, thread and blue CS.

Here are a few quick instructions.

Start by taking a Kraft CS as your base. Add a strip of bicycle PP to the top 1/3 of the kraft base and the mustard PP to the last 2/3 of the base.

Add a strip of orange herringbone PP and yellow spots PP.

Next attach a piece of the hounds tooth material to the right hand side under the middle strip.

Cut out two half circles from the red and woodgrain PP and make into cogs. Attach to the left of the fabric.


Next print your pics. I used the polardroid app that Leo has used before on crafty templates as i wanted a retro feel to the LO. Attach the pics over the cogs and fabric. I stitched around each pic with embroidary thread.


Attach the signpost (from the websters papers in the kit) using foam pads.


Next i cut some circles out of blue CS as embellishments and added over the fabric and signpost.


Attach your title to finish.

And there you go. I love how the kit colours are just perfect for boy LO's and give the project a very retro feel.

TFL

Sarah

Peas in a pod

Here is my second project as your guest DT member this kit. I wanted to make a LO representing all my children as little ones and compare how they all looked and this kit was perfect with its mix of yellow, green , orange and reds. Perfect for both boy or girl LO's.


No real step by step instructions this week as i have done a bit here and there all week and often didnt have a camera with me. All the flowers are handmade from PP with some quick instructions below.


Instructions for cabbage roses
3 x large flowers
1 x smaller flower

I actually made my flowers this time by drawing around 2 different sized Prima paper flowers but any flower punch or die with separated petals will do.

You will need

• Patterned Paper
• Black stazon ink pad
• Hot glue gun
• Heat gun
• Two sized round ended pens or paint brushes.
• Rock candy or rock candy stickles
• Water mister

Instructions

Start by cutting your flowers out of PP and ink all the edges with a waterproof ink.

Use a mini mister to dampen the PP. Take a pen that has a wide rounded end or paintbrush (Claudine’s paintbrushes are great for this). Using a old mouse pad or foam square, gently press the pen/ brush into the middle of the larger flowers. Carefully mould and cup the CS around the pen/ brush.


Repeat with a smaller pen/ brush on the smaller flowers. Dry with a heat gun to ensure they are fully dry for the next stage.

Once all the flowers are dry, carefully open fully the small flower and slightly open two of the large flowers and fully open the last large flower. Glue them into each other starting with the fully opened one at the bottom and the slightly opened ones next. Remember to off set the petals for a more natural look.

Use some knotted embroidery thread to make the flower centre, gluing into place with the glue gun. You can jazz them up with some glimmer mists or rock candy/ stickles.


And i hand cut my title. I used a silhouette download but my cutting machine is playing up at the moment so i printed in reverse on the back of my PP and cut out.


TFL

Sarah

Spring in your step Inspiration

Good morning on this fine Mother's Day.

Its Sarah Carrington (Aka Smelly on UKS) here. I am your guest designer this month and will hopefully bring you lots of inspiration on how to use your beautiful Quirky Kit.

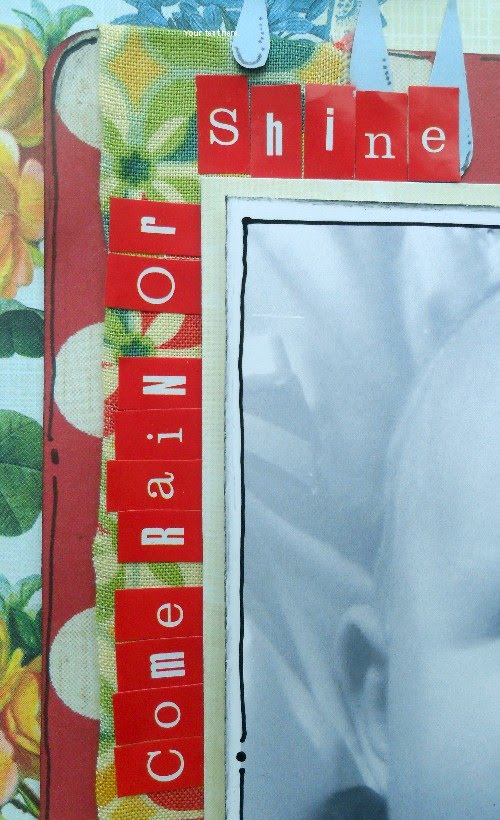
I have my first project to show you today. The theme is very fitting as today up here in the north east of Scotland i think we have had every season, sunshine, wind, rain, hail, you name it, we had it. Everything used is from the kit except the thread and some scrap blue CS.


Here are a few instructions for making this LO.

Start by matting a square photograph onto the cream websters paper.

Next cut a rectangle of spotty paper. Round of the corners and ink the edges. Take a length of the fabric and wrap around the right hand side of the rectangle. Add the photo over the fabric strip, using foam pads to add depth. Attach the matt to the scalloped die cut websters paper.

HINT, before you glue down, make out where the matt is going with a pencil. Then see which of the flowers will be covered up by the matt and cut them out. You will have unsightly holes but you wont see them when the matt goes down.

Next hand cut out the watering cans from the other Webster's paper and attach to the bottom of the photo. Take a strip of the yellow netting and tie along the bottom of the watering cans.


Next take the yellow spotty PP and cut out a circle. Cover the circle with more yellow netting. Cut out random sized triangles to make sun rays. Arrange them around the sun. Once you are happy with the arrangement, number them as it makes it easier to put them back when you are gluing them down. I added every other one onto the page with foam pads.


Once your sun is stuck down, its time to do a bit of sewing. I made myself a little swirly template and tacked it over the sun. I used a needle to poke thru holes all around the sun.


Once you have all your holes preformed, begin to straight stitch around the sun with embroidery thread. I kept mine at 6 strands.


Next, hand draw some clouds from the remaining cream PP and attach with foam pads. Hand draw some raindrops from scrap blue CS and attach under the clouds and sun.


Next its time to decorate. I took a piece of the fabric and stuck it to CS with a wet glue. Leave over night to dry. Once dry, cut out the flowers.


At the same time, cut out the little flowers from the websters paper and pick a few of your resin flowers.


I used a hot glue gun and began to glue all the flowers in little bunches around the bottom


Take the red alpha's and add a title.


And there you go. I hope you like it and i have given you some ideas for using your kit.

TFL

Sarah

Spring in Your Step has left the building!

Your yummy new Quirky Kits are out on their way and should be arriving with you this week.

Stop back here for some inspirational ideas over the next couple of weeks or get out there with your camera and get clicking away and record the beautiful Spring we're having so far.
Happy scrapping!
xx Leo

Mini Book Mania

Hi!

If you have some leftover bits and pieces of kits put them to use making some fun mini books. I've got two examples to show you today I've made with mixed up bits of Quirky Kits.

Arty Minibook


This is a really simple book to make and you can adapt it to suit your needs.
You'll need:
1 12x12 sheet of Sassafras patterned paper, (with the decorative trim).
2 sheets of 12x12 cardstock
Leftover patterned paper scraps and stickers to decorate
Spray mist, (optional)
Alphabet stickers for titles
Ribbon and trim leftovers for decorating.

Method:

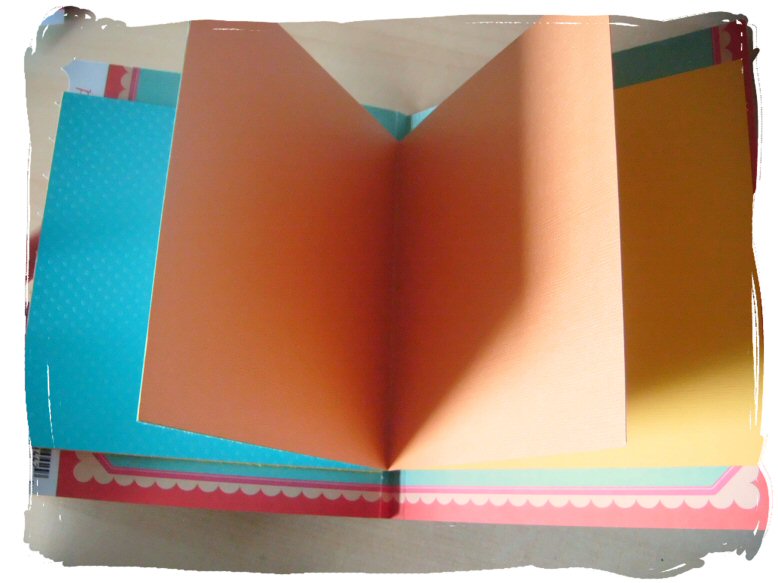
Take a sheet of the Sassafras paper and cut it to 7.5 inches width, leave the decorative strip on the bottom.  Turn the paper around and fold it in half.

Score and fold a ¼ inch line at each side of the center fold line and fold along them to create a spine. This will be your book cover.

Decorate your cover. I’ve used the middle of the diecut Pink Paislee paper from the Makes Me Smile kit, a Sassafras sticker, alphabets and some trim, (this was leftover from the Juicy Fruit Quirky Kit).


To make your inside pages trim some cardstock in half to make 6x12” size pieces. Fold them in half. I’ve made four but you can make a couple more if you want extra pages. Lay them all in a stack with the right sides facing inwards.
Open out one of your cover pieces and glue the left side of your first page to the inside of the cover. It needs to fit inside your book cover so the outermost folds match up.
Keep the page folded and put some glue or tape on the back then add the next page on top of it. Repeat with the next page on top.


When you get to your last page glue it on the right side of the inside of your cover so it matches up to the fold on the right.
 Put some tape or glue on the left side page and fold the opposite page over so they stick together and complete your basic book.


When you open your book the pages should spring open nicely.
Now your book is ready to decorate! 
I've used tags and stickers to decorate and used spray inks on the pages with a doily as a mask. The paper doily was from the She's Creative Quirky Kit.


Back of the cover


My Space mini book


This one is based on a class I've done for UK Scrappers. I love these little tiny 4x4 books they're great to give as gifts for kids to fill in and perfect for using up smaller leftovers. You can download the class here,
http://www.ukscrappers.co.uk/images/stories/library/pdfs/myspaceminibook-craftytemplates.pdf

So there you go, two ideas to use different amounts of leftovers. Get busy with your older leftovers before your new kit arrives!
xx Leo