Paper Fascinators

To celebrate in style every party needs hats but why not put your kit leftovers to good use and have a go at making these fun party paper fascinators instead? You can entertain young party guests making these or make some ahead of time and scatter them or hand them around. It's just about having a little fun!

Method

Grab your leftovers. You'll need some paper pieces, tulle and some embellishy bits. Stamp some motifs onto scraps of card to make extra embellishments if you don't have many left over.

You'll also need something for your bases. I'm using these cheap plastic alice bands but you could use hair clips or combs too.


Begin by cutting small thin off cuts into thinner strips and curling them with scissors to make little paper curls.


Cut out leaf shapes from larger off cuts of paper. Distress the edges and bend them to give them shape. If you wanted to you could doodle on them or ink around the edges too.


Cut out some scallop shapes with a die or punch and snip lines around the edge going towards the center.

Push the edges up to give it an appearance of flower petals.


Add a smaller scallop or piece of paper to the center and add a rose brad or other embellishment on top.


Make more paper flowers in the same way.


To make the bases staple large scallops or circle shapes of card to the tulle and cut them out leaving a small boarder of tulle around the edge of the card.


Staple a smaller piece on top so you can glue your decorations to it. If you try to glue them on top of the tulle directly they'll fall off.


Glue the embellishments you've made to your base.


Add some more embellishments on top to build up depth and interest.


Here's another one with a fabric flower added.


Glue the bases to your chosen hair accessory with a glue gun.


Have fun thinking up the designs and have fun this weekend if you're having a party!

xx Leo

Bake-a-long part 3

Finally it's time to decorate the cakes!

Coconut Cupcakes with Lemon Frosting

For the cupcakes frosting I've cheated and used ready made buttercream but you can make it easily mixing 50g of butter to 200g of icing sugar, this will cover about 12 cakes so if you need to alter the recipe to make sure you have enough. If you want your buttercream softer add in a tablespoon of milk. To the buttercream mix I've add some lemon zest to give it a lemon tang. You could add the juice if you preferred but swap that for the milk so as not to make your buttercream runny.


Pop a teaspoon full of buttercream on the cake and smooth it around with a butter knife. If you want to be all fancy you can use a piping bag but I think they look just as good spooned on.


For a final touch add a little more grated lemon zest then add in your union jack cupcake picks from your Quirky Kit.

Yum!

Red, White and Blue Cakes

To make this frosting make the same basic buttercream mixture. Melt the white chocolate but leave a small amount to one side for decorating. Mix the melted chocolate into the buttercream. If the buttercream stiffens add an extra tablespoon of milk.


Add some of the white chocolate buttercream to each of the little cake layers then stack them up on top of one another to make the red, white and blue layers.


Cover the whole of the little cakes in the buttercream. I also rolled mine in some of the leftover coconut just on the edges. Grate the leftover white chocolate on top of the cakes then add the red edible glitter. You can put them in cake cases if you want to or pop them on a platter or plate. Once the frosting has hardened, (it will form a nice shell as the chocolate sets) they're quite easy to move around.

 When your friends and family dig in they'll get a fun surprise!

 Yum, stripy cake!

If you didn't want to conceal the colours just decorate the tops of the cakes. This one just has a bit of buttercream and coconut on top.

There's the cakes done!

If you have made the sheet cakes and have some leftover bits of cake from cutting out the circles you can mix the leftovers with some of the buttercream and make cake pops too!


Squidge the cake and buttercream together and roll into balls. Roll the balls into coconut.
Add lolly sticks to the balls and pop them in the freezer to harden. Once they're firm roll them in chocolate and leave it to set.


You could also use your leftover bits of cake to make a fun red, white and blue trifle using them as the bottom cakey layer.

Now the cakes are done. Next we need to make some decorations!
Grab your kit leftovers for some fun party decorating ideas coming up later.
xx Leo

Bake-a-long part 2

OK next I've got some really fun little cakes. There's two ways you can use this recipe. You can make three sheet cakes, (you'll need a shallow large tin like a swiss roll tin) or you can make a sandwich cake and put the different coloured batters together in round 8" tin.

Red, white and blue cakes

Ingredients:

150g butter
150g sugar
2 medium eggs
4 tablespoons milk
150g self raising flour
Blue food colouring
Red food colouring
200g white chocolate
Buttercream
Coconut and red edible glitter for decorating, (optional)

Method
Measure out the butter and sugar and mix them together in a bowl until light and fluffy. Mix in the eggs and milk until the eggs are Incorporated fully to the mixture. Next measure out the flour and sieve that into the bowl. Gently stir it in and then once the flour is Incorporated beat the mixture until it's pale and light. Now if you're making one cake split the mixture up into three bowls then add the red colour to one bowl and the blue colour to another. Leave the last batch white. Grease and line your cake tin then spoon in the mixtures one tablespoonful at a time so the colours keep in separate clumps in your tin, don't mix it or smooth the top as this will marble the colours and you'll end up with purple cake, just tap the tin to make the mixture sit flat. Bake it for about 25 minutes in an oven pre-heated to 180c.
Now if you're making the layered cakes like I've made you'll need to make three separate sheet cakes so start with the white cake and place the batter into a greased shallow tin then bake for around 10-15 minutes in a pre-heated oven at 180c. Once the cake is cooked leave it to cool for around 10 minutes then turn it out of the tin.
Make another batch of mixture but this time colour it red, you'll need about 2 tablespoons of food colouring to get the red colour, it does intensify once it's baked. Cook the mixture in the same tin you've used for the white cake but remember to clean and re-grease the tins as you go. Cook it for the same time as the white cake. While that's cooking make another batch of mixture and colour this batch with the blue food colouring. Cook as before once your red cake is cooled and turned out.

When your cakes are finished you should have three different coloured thin cakes. Use a cookie cutter in a circle shape and cut out circles of cake. I found it easier to put the cake back in the tin and then cut the circles out. You could also use something else circular to cut around if you didn't have a cutter. Put the circles to one side to cool completely.


In the last part of the bake-a-long we'll be doing the fun decorating bit!


xx Leo

Bake-a-long Part 1

Hi!

Are you getting ready for the party tomorrow? Here I've got some yummy bake-a-long recipes for you to have a play with. Later today they'll also be decoration ideas so even if you don't want to join in with these recipes you can follow along with the decorating later.

Coconut Cupcakes with Lemon Frosting

Recipe:
100g butter
100g sugar
2 medium eggs
100g self raising flour
50g desiccated coconut

Method

Pre-heat your oven to 180c then measure and mix together the butter and sugar in a bowl till it's light and fluffy.
Add in the eggs and mix together until the eggs are well combined.


Measure the flour and sieve it into the bowl, gently mix in the flour then beat the mixture until it's light in colour and smooth.

Measure out then gently stir in the coconut to your mixture.


Pop some cake cases in a cake pan and fill with the mixture 3/4 of the way up. Pop them in the center of your pre-heated oven and bake for around 20 minutes. You'll know they're done because when the tops are gently pressed they'll pop up, if they don't pop back up they're not done yet.
Leave to cool. They need to cool completely before decorating so we'll be decorating them later.


Drop by later when we'll be baking some fun red, white and blue cake!
xx Leo

Bake-a-long Shopping List

Hi!

If you're going to join me tomorrow with the Royal Wedding bake-a-long here's a quick list of goodies you might want to grab. You can make any cake flavour you like but after much deliberating and mind changing I've narrowed it down to two flavours:

Coconut with lemon frosting
100g butter
100g sugar
2 medium eggs
100g self raising flour
50g desiccated coconut
Buttercream, ready made or butter & icing sugar if you're making your own.
1 lemon

Red, white and blue cakes

150g butter
150g sugar
2 medium eggs
4 tablespoons milk
150g self raising flour
blue food colouring
red food colouring
200g white chocolate

Extras
Cupcake or muffin cases, paper or silicon
Sprinkles, I'm using red edible glitter for the red, white and blue cakes you won't need any for the lemon ones.
Union Jack cupcake picks from your Quirky Kit

Other ideas you might want to try:
Pink velvet cupcakes
Chocolate cupcakes
Rose flavour cupcakes


Grab your goodies and bake-a-long tomorrow afternoon!

xx Leo

Quick card

As promised here is a quick card made from more scraps of the kit.


Instructions

Cut a rectangle of PP slightly smaller than your card blank. Ink the edges and attach to the card.

Take some kraft CS and cut into 3 rectangles, exactly the same. Ink the edges. Trim 3 rectangles of PP slightly smaller than the kraft CS, ink the edges and attach to the kraft CS. Attach the rectangle to the card.

Take a scrap of PP, i used the large red spotty, and make a scalloped border. Attach over the rectangles, towards the bottom of the card.

Hand draw a journal card on kraft CS and attach towards the right hand side of the card, just above the scalloped border.

Take a length of fabric and tie it around the card, tieing a bow on the left hand side.

And now its time to embellish. I made a paper rose from the red PP and glued it on with a hot glue gun. Glue on the felt flower and a epoxy rose. Cut out a few leaves from one of the PP and mount on green PP from the kit. Attach behind the flowers with foam pads. Add a bird whimsy and finish with a little alphabet title and button.


And there you go, a quick and simple card that would be suitable for many occasions.

And that is me done as your guest DT for this kit. I have had a great time and I hope i have shown you a variety of projects that have inspired you to break into your kit and have a go. If i have, i would love to see your creations so drop a link into the comments section.

Thanks once again to Leo for the chance to play with her beautiful kits.

Sarah

u R my little stars

Happy Easter. Hope you are enjoying the sunshine, if you have any. None for us up here in the far north i am afraid.

This week i have created a mini album from the kraft cardstock, the pizza box and the left over scraps.


Instructions

To begin, take a piece of PP. I used the woodgrain one from the kit. Cut at 6" x 12". Score 2" from each edge. Then Score every 1" all the way across. This makes your concertina for your pages.

Next you will need to make some tags for the pages. Each tag needs to be 1 7/8" x 3 7/8" and you will need 12 in total. Ink all the edges in black ink.

Next take all your PP scraps. Trim them so they are slightly smaller than each tag. You will need 24 in total. Ink all the edges and attach to the tags.

Attach 3 tags to each concertina spine. The top tag goes on the right side of the spine, the middle tag goes on the left side of the spine and the bottom tag goes on the right side of the spine again. Repeat for the remaining spines.


So that is the inside pages made. Now its time to make the album covers.

Cut two pieces of pizza box measuring 4 1/2" x 7". Also cut a spine 1 1/2" x 7". Take your hounds tooth fabric and place it best side down on the desk. Place the cover down, then spine, then back cover. Glue them into place with a strong PVA glue or fabric glue. Leave a slight gap between each piece, probably about the thickness of the pizza card board. Leave to dry.

Once dry, trim away the excess fabric, leaving about an inch all around. Fold in the corners and glue the fabric into place. Again leave to dry.

Once completly dry, cover the inside with kraft CS, using a bone folder to score along the gaps to make a nice neat fold.


Take the spotty ribbon and attach a piece to each cover with strong glue/ adheasive. Attach a piece of inked PP to the front and back covers to hide the ribbon. These will be used to fasten the album.


Next its time to decorate the cover. Take a rectangle of Kraft CS slightly smaller than the cover. Ink the edges and doodle with a black pen. Attach a piece of PP to the left with a slightly smaller one to the right. Ink and doodle again.


Next hand draw a star and cut it from more pizza box. Cover in PP, ink and doodle the edges. I stamped a journal stamp into kraft, distressed it with inks. I added it to the star before tieing string and grey netting around the star.


Next make some embellishments.

The first is a length of hounds tooth that has been turned into a rosette. Hand stitch along one side of the fabric, pull the thread to gather and secure with a few stitches. Glue a circle of PP and a button to the centre.


The next one is a pin wheel. Cut a large circle of netting. Stitch around the outside and pull the threads. Stitch a circle of hounds tooth fabric and another button to the centre.


The next one is another pinwheel. Make a slightly smaller circle, stitch around again and pull the threads. Secure the middle with a button, then stitch to a slightly larger circle of spotty ribbon.


Glue the first two flowers to the cover and a websters whimsey flower, just below the journal card.


Cut out a arrow and place it above the journal card. Add little alpha's and large alpha's to complete your title.


And that is the cover complete. Secure the whole panel to the fabric with a strong glue/ adheasive.


Next its time to attach your pages. Glue the 2" flap from the concertina spine to the edge of the front cover nearest the spine. Repeat with the back 2" piece. Cut out some stars from scrap PP again. I added another arrow to the front and the fabric flower we just made to the back.


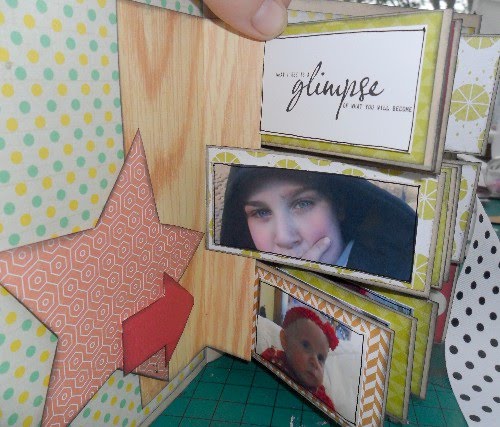
Next attach your photos. I added mine using foam pads so they popped from the page. I also added in a few stamped journalling cards as well.


And there you go, a mini album perfect for using all those little scraps. I hope you like it and has inspired you to have a go.

I have a card made from scrap as well but my camera batteries have died so i have sent DH out to the nearest town to get more as we dont have any shops in our village, lol. So i will pop back probably tomorrow now as loosing the light and show it to you.
TFL

Sarah