
This month I wanted to have a play at using papers in a patchwork style. You know the beautiful patchwork quilts with squares or other shapes made up of loads of different patterned fabrics? Well how can you not be inspired by those and try out the same effect with patterned paper. I did also think that a kit is perfect for working a patchwork design into your projects because all the paper co-ordinating is done for you so all you need to do is cut up the papers and then stick til your hearts content! You can use it as a fun way of embellishing and making your own patterned paper up. You could go crazy and create a whole background of patchwork patterned paper or a whole mini book! Make your Project Life cards with smaller cut out shapes, so many possibilities with this so it's a great starting point.
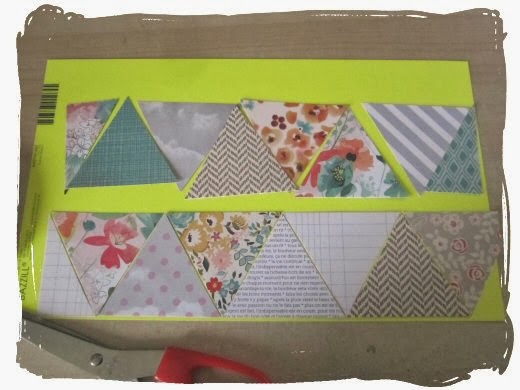
I've seen some work done using quilting patterns and folding paper and making really fancy patterns to be honest that;s too fussy for me so I've gone really simple for mine and stuck to cutting out circles with a die, squares with my paper trimmer and triangles using the Kesi'Art paper in the Lite kit because it already has a patchwork design on it. I just nicked one of the triangles from that and used it as a guide to cut around to make more of them!

The neon card in the Jan/Feb main kit is wackily neon so it's nice if it's used in little pops like the interiors trend. I've used it here as a backing for the patchwork paper I'm making so I'm just leaving really small slivers of it between each of the triangles.

Here's the finished page I used it on. I've gone really scrappy with this one making lots of layers with paper pieces I had left over as well as the stickers from the main and embellishment kits and the card embellishments from the main and embellishment kits. The chipboard stickers from the embellishment kit I've stuck down so they're underneath the journalling card so it both acted as a bit of decoration and made the journalling/photo bit lift up away from the page to help it stand out against everything going on.

I also made a little series of notecards using the same idea. Little note cards are handy to keep in to add with parcels or for notes. A co-ordinated bundle of them make a nice gift too.
I started out printing some messages onto the plain white cardstock, (using Word and some nice decorative fonts) and then cut out some squares of paper and some little circles using a Nestabilities pinked circle die and my Cuttlebug.
The squares were 1 inch and the cards I cut out were 6x4 inches. I played around with the placing first and then I picked out some foam pads to fix them down to the card.


The circles were a bit more difficult to place because there's no straight edges so I put the middle on down first and then two each edge then filled in the ones in between.


Here's some more using the same squares and circles. I've put these squares together with no gaps to make a 'proper' patchwork design.

Another circle one with flat circles stitched in place with the sewing machine. I've used some of the notepaper from the main kit and the greeting is printed on white card and cut out and stitched on like a clothing label.

This one's a proper opening card not just a flat notecard. I made some larger 2 inch squares from the paper and then cut them apart on the diagonal to make triangles then pieced them back together to make the patchwork design.

The paper I stuck the patchwork design onto was the lovely Basic Grey paper from the main kit and I really liked both sides of that so I cut out a square from the front of the card to let some of the back show through inside the card so it just gave it a bit more interest and didn't waste the pattern!

I hope it's inspired you to have a go at playing around with paper patchwork on your projects. I think it's a fun way to use up any of your ready co-ordinated kit papers from this kit or any of the previous ones too.
Have fun!x Leo
No comments:
Post a Comment