Quirky Kit Classes

Hi Subscribers!

The first of the new Quirky Kit classes has been sent out to all subscribers. You can also grab the download here, http://www.craftytemplates.co.uk/QuirkyClasses/QuirkyKitsClassDec2016.pdf


The classes are presented to you in this downloadable format so you can choose to print out the sheets to keep along with your kits or save them digitally to work from your phone, tablet or PC. The classes run through ideas using your kits as well as tutorials for layouts and tips and tricks you can learn to incorporate into any page or project you’re making. These are all designed to get you creating with your kit no matter what your scrapbooking experience so grab your kit box, dive in and see what you can come up with.

Have fun!

X Leonora

Lagom for summer time

I managed to find a little corner of time over my Christmas break to dive into my latest Quirky Kit, the beautiful Lagom main kit, designed to show off festive, wintery photos. So I used it for a photo taken 6 months ago in midsummer!
 Red and black are my favourite colours to craft with and wear so any kit that features those heavily is going to suit me. And with gold touches I am in heaven! I just adore that American Crafts DIY 4 gold foiled star transparency sheet so wanted it to have centre stage. That meant finding a way to anchor it. I went through the papers and cut strips of various sizes from them to tone with the photo. I added black pen to the red/white stripe paper made specially for the kit.
And of course, black pen to outline around everything. I sorted through the tags for some that would suit and cut the red/white one into three small tags (the little white tag with the date on is the other side of the tag. They have the most amazing texture) I swapped out the ribbon on the "another year over..." tag for a red one to match the page. I smiled at being able to use this Christmas song phrase for a birthday page.

I took one of the wooden hearts and smothered it in multi medium before pouring extra fine glitter on the top. While it was drying I assembled my photos and tags, adding a few paper clips for interest. The red tags and photo have foam pads underneath them. 

I failed to think of a very exciting title, but the letters have enough pizazz to overlook that I think!
They are really very sticky so although I didn't quite get them in the position I wanted to, they are staying as they are! I wrote the journalling in three sections and then finally added some of those lovely white and gold flowers, a gold flair button and the glittery heart as finishing touches.

I ran out of crafting steam following my move and new job but it is all coming back to me now (hurray!) and it means I have two layouts featuring the Cakewalk and Hooray (appropriately enough) to share with you that I haven't before.

 I had fun colouring in the Amy Tangerine Oh Happy Life, Crazy Fun patterned paper and cutting out lots of dots from the Dear Lizzy Saturday Bagels one. I also triple embossed the wood veneer word to make it stand out more.

 This one involved lots of layering and the last of the fun bobble ribbon. I used a similar product to Nuvo drops for the circle and coloured in the ferns with a silver pen. I also used some grey/black/white washi tape from my stash


Obachama

I hope you've all had a lovely Christmas! As well as the usual spending time with family, eating and watching TV I was especially excited to open two new sets of watercolours. I thought they'd be fun to use on my first layout with the 'Lagom' main kit and 'Fika' embellishment kit. I used a photo I particularly like with my Japanese grandma that was taken in the summer, even though these kits may seem wintery or festive at first glance you're certainly not limited.
I painted large flowers because 1. We were visiting a garden 2. My grandma always make me think of flowers. As you can see below I used the paint with lots of water to make the colours soft and pretty.


 For this layout I did a very small embellishment cluster with a Craft Perfect bow and Freckled Fawn  puffy sticker, they're small and subtle but add a bit of dimension.
I layered behind the photo with the lightest and brightest pattern papers and journaling cards from the kit, I tried to arrange them in a wonky way so they'd seem more naturally placed.
I love this technique of using a fine liner to draw letters then cutting around them. Each letter is individual and you could use any paper, size or font to match your page. For this page I wanted quite small letters for my title 'Obachama' meaning 'Grandma' in Japanese. I wrote about how I associate her with flowers in my journaling along the stems. If you'd like to see my full process, please watch my YouTube video below:

Thank you so much for looking at my page and an early Happy New Year!

Participation in Advent Calendar Swap

Hello everyone,

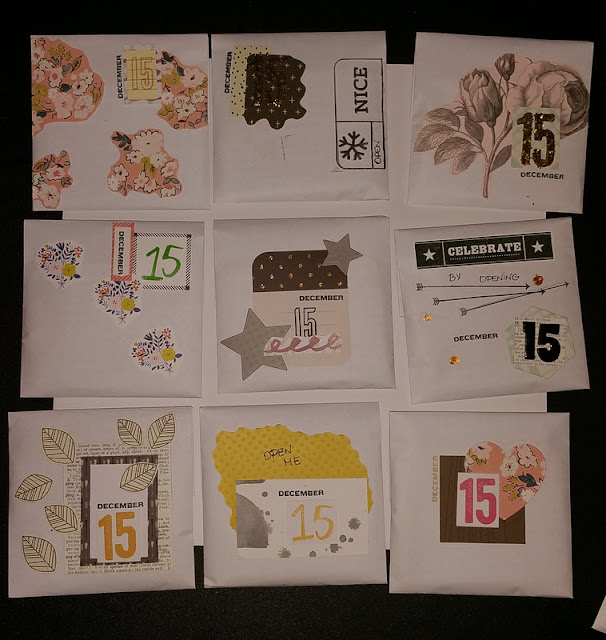
One of my goals this year was to participate in various swaps due to the fact that I was caught up with my project life albums and other projects, so I didn't have anything else to work on. This months swap was the Advent Calendar and the idea was that I create 19 envelopes with the number 15 and other four with the number 23. Then after that, I send the parcel with these envelopes to the swap moderator and she sorts it and sends back the ready made advent calendar.

I thought that as I still have many bits left from the kit and I have loved working with it as well. I used it to decorate the envelopes in the swap. However, I had to pull some number stickers from my stash. Here are the finished envelopes that I sent. 


Mainly I used my dies to cut out various shapes, but at the same time I cut out some flowers or leaves and of course I used a bit of stamping, which I love.


I hope you enjoyed this post even though it was a quick one, Agnese.

#Forever Strong Crew

Hello everyone,

Continuing with the theme of my previous posts I am still working on scrapbooking my graduation day, but I promise this is the last layout, as I wanted to ensure that every part of that event is included in our project life album, but didn't want that it takes up the whole album.

The materials used to create this layout was again from Scots Pine Lite and Willow main kit. Actually out of all layouts I have done this month, this one was my favourite to make and the look of it as well.


The first thing I did was to select the papers I used behind the picture based on the three colours - black, navy and pink. After sorting the placement of the photo and the background, I started to work on embellishing it. So the idea behind all the die cut flowers came from the Pinkfresh die cut pack.


The final step was to work on the title, similar to the previous traditional 12x12 layout. As one of the papers is black, I thought it is a good idea to use black word thickers in the kit.


I hope you enjoyed this post and love this layout as much as I do, Agnese.

Quick Scrapbooking with the Lite Kit

Hi Leo here!

Today I want to share a layout created with the 'Scots Pine' Quirky Kit Lite. With the last 3 lots of kits we've had I've tried to put together kits to make it quicker for you to create pages to try to combat the 'I can't get time to have a crafty play'. The custom cards and sheets in the kits are designed to co-ordinate with everything in your kit as well as an aid to create pages really fast because you're not having to cut up paper to mix and match, they're a great grab and go embellishment. They also work as journalling spots and breaks for titles.
I've done some step by step photos to share how I've worked with the cut apart sheet from the Scots Pine lite kit on this layout.

OK so to begin with I've cut apart one of the sheets to give me nine little cards.

Next I've cut a 5.5" wide strip from the Sierra paper, (the part with the yellow stripes). Then I've cut out a 4.5" strip from the Morland paper, (the part with the blue paint on the flowers).


Then I've cut a 3" strip from Morland  to use the side with the blue flecks pattern. 


 Then I've spliced them all together to make a full 12x12 sheet. I added glue along the edge of one paper then added the next on top. I've used a sheet of 12x12 cardstock just sat underneath like a template to get the edges of the papers to be square as I'm gluing them together.


That's my background sheet done. You could just as easily use a full sheet if you wanted to, I just couldn't decide which of the bits of the papers I wanted to use so I've cut apart the bits I wanted to use and put them altogether.


Next I've cut apart my photos. For this layout I've got six small photos. These have been made by adding three photos to a 4x6 size photo sheet before printing. You can do this with photo tools like Google Photo using the collage option really easily. If you have photos to use already you can cut them apart to make a shutter effect dividing them into threes or fours.


OK next I've picked one one of the cards and glued it to the layout so it's between where the black dots on the paper start and finish.


Then I've glued one of the photos on top.


I've just carried this on working across my page from right to left.


Now I just need to add some title details to my page. I've picked out the titles from the sticker sheet in the kit that work best for my page. I've added one to the right edge, just because this is where I ended up with space in my layout. I also like how it's sat where the dots finish as it leads the eye into the photos/title.


To 'ground' the title, (I say ground a lot and I just mean to stop something looking like it's floating around a page) I've gathered together the three remaining cards and just fanned two out to make a background for my title then the final one with the leaf pattern which didn't fit with my layout I've just flipped it over to use the journalling side instead. This fanning out of the cards could be another way to create a layout background if you have one photo instead of the split up lots of smaller photos.


Next I've pulled out the Gather foil stickers from the kit and just added some to the cards alongside the photos.

Then finally I've got the Nuvo dots from the kit and added some copper dots to compliment the black ones already on the paper. These also work to tie in the copper coloured stickers.


Tada, one finished layout! It took about 30 minutes, if that to create my layout and I was writing up my step by step and photographing as I'm going along so if I skipped that part it'd have been even less time spent. I still got the same sense of satisfaction too. This kit really does make it really quick and easy to create a page! I'm a total procrastinator too so if I can do a quick layout, anybody can! Get your kit out of the box if it's still sat there and get creating. The biggest hurdle is always making that first step to getting started. ;)😉


xoxo Leo

Fun Friends

Hey guys......December already?

Here's a layout I recently made, the kit was quite autumnal in colour scheme, but the photo I chose to use is from a summer trip.


I loved all of the Maggie Holmes Gather collection that we received and the pretty pink floral paper was my favourite. I didn't manage to pick up an extra piece of this particular sheet, so to make the most of both patterns I chopped it and turned one piece over and covered the join with the polka dot trim.

I also backed it all onto black cardstock for stability and to tie the layout together.

To back the photo I used the tissue paper that the kit came wrapped in, and popped it up on 3D foam. I then played around with various embellishments, including the Pinkfresh Studio ephemera and Reset Girl chipboard until I found what I liked. I had been wondering where I would use the planner girl piece, so was pleased to stick it down.


To finish I used the gold phrase stickers and some gold splatter most. I also used a 'cool' bobbie pin tucked over the ribbon.

Thanks for taking a look!