Leo here :)
One of my favourite bits of the new kits is the Bella Blvd. Confetti Clear Cut transparency sheet in the main kit so I wanted to stretch it out a bit and use it for different things.
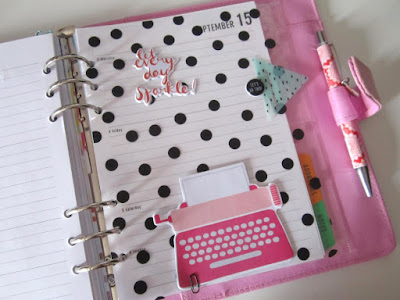
The first thing I did with my sheet is to make a new dashboard/divider for my planner for the next month ahead. I'm still going strong with my Paperchase planner I started in December last year. I have one page in it that I use as a template, it was the first page in the planner when I purchased it, (like a plain page with the Paperchase logo on it) so I swapped it to the back of the planner to use as a template to add in my own custom pages made from kit stash. I cut out the page size from the transparency making it a little larger than the paper pages so it works as a divider and cut out the holes in the right places, (really handy to have a one hole punch if you're making your own planner pages, I think I've mentioned before that the one I'm using is one of those little ones from a Christmas cracker, it works!). I've rounded the edges, (with the punch on my WRMK envelope punch board) and then added a few embellishments from the main and embellishment kit then I fixed some of the typewriter note papers from the Lite kit to the bottom of the page using one of the mini paperclips also from the Lite kit.
Here's the finished article in my planner all ready for September. Can't believe it will be September already next week, how crazy fast is this year going!
OK another thing I made with the transparency is this little shaker box. I'm not sure yet whether to put this on a birthday present with a gift tag or on the card I'm making for the same birthday but I think they're really fun to use as embellishments for all kinds of things. You could even make one into a Project Life filler card.
Really really simple, if you've done this before you probably know all the steps but if not.
1. cut out a piece of card and piece of transparency the same size, get some sequins or other bits for the shakers, (I added a puffy sticker with paper covering the sticky back). 2. line the outer edge of the card piece with foam pads or foam tape. 3. Stick the transparency over the top. 4. cut out another piece of card slightly larger than before and cut the middle out of it, (really simple to do if you have a paper trimmer with a ruler on it). Glue the frame over the top. Done!
And that transparency sheet is still going! Here I used a bit as a layer under my photo on this scrapbook layout. There are the fab printed acetate triangles in the embellishment kit and the vellum paint brush chips in the main kit which are great to layer with cut out bits of the transparency sheet.
I used a little bit of stitching to hold down the transparent layers and also there's tape under where the photo covers the layers and the puffy sticker on top also acts as an anchor gluing the transparency and vellum embellishment in place.
So there we go three different ways with transparency!
I'll be back soon with a few card projects and a 9x12 size page I'm still working on.
x Leo


No comments:
Post a Comment