Simply lovely

that is the name of my layout not what I think of it (I wouldn't be that boastful!)... although there are some elements that I really like
Some of it was planned and some kind of just came to me.
As I am near the end of the kits they were now all jumbled up together. I decided that I wanted to use a few strips of papers on one side of the page and the stamps as frames on the other (as the layout is about a gallery) I wanted to keep things relatively simple so that the beauty of Barbara Hepworth's sculpture could still stand out. I thought that using the cork pieces would also work well as she liked natural elements to work with. You will notice that two of the cork tiles have been turned over so they are blank - well it worked for me!

I found some papers that toned with the photos and then thought that I wanted another element and what a shame it was that the voile fabric had gold stars on it as I really wanted something more silvery. And then I turned it over and discovered it was perfect on that side! I attached it to the paper with my tiny attacher (I have finally worked out what to do to in order to make it usable anywhere on the page. I have read what to do many times but it took looking at this to finally get it. You can expect to see a lot more stapler action in the future...). I just love what it adds to the page - a floaty ethereal quality - which is what that garden has (Lythan wafts away into nonsense)

I stamped the frames onto the Studio Calico Monochrome paper which I also used behind the cork frames. I added a puffy arrow onto a layered embellishment
but left the rest quite simple.

Inspired by Leo I thought I would have a go at a hand cut title. Luckily for me, I still had the word "lovely" left on my set of Heidi Swapp word stickers so I used that as a guide, sketching the word out in pencil. I then went over it to create thick lines and cut it out. I erased (almost all) the pencil lines and went over the word with a Wink of Stella glitter pen to add some sparkle. I added small foam dots underneath the word. The word "simply" is die cut using a MFT alphabet

White rabbits

Maybe I should have saved this one for the first of the month?
My layout was inspired by this Creative Scrappers Sketch
I tend to start off by following the sketch and then going in a totally different direction. This one began with layered squares but ended up with only 3. And not quite squares and not quite as symmetrical as the sketch either
but I like it and that is what matters!
I used the grey cardstock from the kit and first took some texture paste and a dotty mask and made random dots on my layout.
I then chose 3 photos of my daughter and had fun layering lots of different papers behind. The bottom right photo had a delicate frame made from two oval dies on the top - one of the many echoes of the sketch that you can see.
Because I used a lot of papers, I went round the outside of each one with a thin black liner. I make sure that my lines are not totally straight. That makes the fact that I can't draw straight lines a design feature rather than a flaw!
I used a lot of those lovely Heidi Swapp word stickers. You may have observed that "yay" is not one of the words - I cannibalised two stickers to make that work!
It is a bit scary placing the stickers on the photos - you have to do it carefully and then be happy wherever they are as there is no peeling them off again!
I added one of those fab puffy arrows as a focal point
as well as some grey brads from my stash.
The title was cut on my Cameo and liberally sprinkled with glamour dust. I added two gems from my enormous pile of them because the letter i dots were just too tiny to do anything with
I love the mix of golds and greys/silver in these kits - it is amazing how many different looks you can get from the papers and embellishments


Always Wonderful

Hello Hello!

I've been working with those wonderful Pink Paislee Colour Wash papers from the main kit again this week, they really are the most gorgeous papers to work as a backdrop for your photos. My Youngest is terribly fond of hats at the moment, he has been known to wear one for the entire day and then take it to bed with him! I think I will add that journaling to my page after I have shown it to you...


I started by putting dimensional tape over the back of the Die-cut PP and placing onto grey Cardstock, I then used a stencil to create the distressed squares in weathered wood and added some brown splotches of ink. I used the pattered organza, scraps of Heidi Swapp mixed company and a banner of Amy T Grainy Goodness to mat my photo. I tucked another white embossed frame in between the mats for a bit of contrast.

I then embellished with transparent die-cuts, a fabric brad, a cork frame from the main kit and wooden arrows and twine from the embellishment kit. I could have used the silver twine from the main kit though.

Here's a close up of my little one...in this picture he is wearing the hat my eldest wore for his Christmas performance.


Thanks for visiting today, I hope you are having fun with your kits too!

Nikki x

Counting Down to 2014

Hi There!

What Fabulous sneaks Leo posted up for us all to enjoy! I don't know about you but I can't wait to get my hands on some of those products!

There's plenty still to be enjoyed with the current kits though, and I haven't even broken into the lite kit yet!

This layout was made using elements from the main kit and the embellishment kit. We were lucky enough to be invited to a New Years Eve Party this year and fortunately (or unfortunately, depending on which way you look at it!) there were lots of photos documenting what a very good time was had by all!
To start I sponged a strip of SC Merrymint PP with blue and teal acrylic and another strip with festive berries Distress ink. I made sure my sponge was a little damp so both mediums spread easily and smoothly. I stuck both strips onto white cardstock, and made borders with the Crate Paper PP. I used the Journalling card and some of the Heidi Swapp Mixed Company PP for a bit of interest and for somewhere to put my embellishments. I love how the frame from the prima stamp set looks, white embossed over a scrap of the Amy T Grainy Goodness PP. After putting on the title I felt something was needed to tie the 2 halves of the page together so I used another stamp from the Prima set, gold embossed the year over the top and journalled around the wreath. A cool look don't you think?

What do you think? Be sure to drop in and let us know, we love to hear any feedback!

Happy Scrapping!

Nikki x

CHA week - pick of the goodies part 2

Hi!

Leo here again. I've got a few more picks of the new goodies from the CHA trade show. Here's more of what's catching my eye from the new US lines and some of the trends popping up.

I'll start with Studio Calico:
Like the American Crafts DIY collection Studio Calico have a basics line with woodgrain, gold and cork embellishments. I like that you'll be able to mix these with any colours you're using and maybe even customize the cork ones with inks/ mist sprays?
There's lots of vellum and translucent materials popping up so that's definitely another trend. It's not just in sheets it's in more embellishments and stickers too. The vellum labels I've picked up on because they'd be good to add titles/journalling over areas of photos you want to mask or just create layers with them on cards. Yellow is another trend overall and Studio Calico has picked up on that with lots of yellow across their patterned papers. I do think yellow is a good colour as it's one of those that works for everyday and for boy/girl and for garden/outdoors/summer holiday so many different things so it's a useful colour to have in your supplies.

OK onto the next one. Out of all the newer collections I think my favourite has to be the Heidi Swapp new goodies. The colours with the hint of kraft and the watercolour tones with the bold black and white mixed in is a real eye catcher.
I really like the epoxy stickers too, they're just like the glitter stickers we had in the December Lite kit but in bright colours perfect for the spring/summer. I also really like the mini stencil packs too. Stencils are big this year both using them with paints/mists/watercolour but also texture is a trend so using them with modeling pastes to create textured backgrounds/embellishing is definitely something I want to pick up on in the kits this year.

Simple Stories next:
 
Simple Stories have picked up on the trend for mixing bright colours with crisp black and white and I really like some of this DIY Boutique line. Some of the icons used in the embellishments with Simple Stories put me off a little bit as they're a bit over saturated, (like the moustache, anchor and glasses motifs which have been on everything but I don't really see as good ones for general crafting? Just me?) It's the colours though that have got me with this one they just really jump out and look exciting so that makes me think that what's made with them would be just as eye catching whether that be cards or scrapbook pages/mini books whatever you're making. :)

OK last but not least Basic Grey.
Basic Grey are making a little bit of a revival for me. I really like this new line designed by Kelly Purkey 'Mon Ami'. The colours I think are what's grabbed me the grey mixed with the red and yellow make a really interesting colour combination and overall it's nice and soft on the eye. 


Basic Grey have also got some really interesting embellishments. The acetate die cuts and frames look really fun and will be great for layering over/around photos or over papers on cards. The wooden shapes in the new Highline collection have been given a little chalkboard too so that's a nice combination and I'd be interested to see if you could use chalk markers or chalk on top of those.
The Highline colllection looks really fun and bright. Yellow is in this one too mixed in with pink, red grey and white. The brush script trend is here too. 

I'll leave it here for today. I've got one more little look at some of the more under the radar bits and pieces I've pick up on at a later date. As always let me know what you're liking the look of or what you want to see more of in kits.

x Leo

A touch of gold

Well actually rather a lot.
Which made photographing this layout quite a task!
 One of the important reasons for having children is of course to embarrass them. And we find it hard to stop. There are plenty of photos of us looking normal but when you have a tripod and a remote (and photoshop!) then it isn't long before our silly side comes out.

So I wanted to create a layout that was both playful and proud at the same time.
I began by taking one of the pieces of white cardstock and adding gold gelato which I then wet with water and allowed to run down the page. I also added some Heidi Swapp mist in Gold Lame (which is a must have if you love golden crafty things) (and I would put an accent on that e if I could remember how as it is not Lame at all...). Again this was painted on and allowed to drip down.

Then it was left for several hours to dry.

Well it would have been if I was sensible. There was a lot of water on the top of this page and I didn't leave it long enough or use a heat gun which made the letters very hard to adhere later on.

I cut random strips of different papers from the kits that had gold or yellow or black elements in them including the washi tape, mirrored card and voile and then spent time playing about until I decided I was happy with the layering. The photos were added on top using foam pads to give some dimension
I added some Heidi Swapp Gold mist to some of the chipboard arrows.
ooooooooh they look so lovely
And then stuck some of the gold letters alongside some tiny typed letters from stash to make my title at the top
And finally some of the words from the Crate Paper Market paper that summed things up so well - attached with my tiny attacher. If I had thought, I could have sprayed the staples gold before I started - but maybe that would have been a touch of gold too far?


Recording Christmas

is not something my family is great at.
But then my kids are past the cute stage now and we have never been ones for many photo opportunities on Christmas Day preferring to live in the moment/work/sleep.
So it is important to capture some Christmas memories, even if the photos aren't great.
I backed woodgrain paper onto the cardstock from Its been and then misted and splattered Heidi Swapp mist in Seafoam over the page and some of the parts of the Heidi Swapp paper from the main kit I was planning to use. I also painted the mist onto the 13 on the paper. It didn't make it as aqua as I had hoped but still has a pretty sheen!

I added lots of outlining to make the words pop and die cut letters using the Parker dienamics alphabet set. The woodgrain letters are from an old kit but the pink letters are from stash. I went old school with the "13" adding a black and white border with black felt tip and white gel pen (tip: if you are doing this always do the black before the white. It seems counter intuitive but the white gel goes over black but vice versa you get a muddy grey).

I added white paint behind the word "silly" to make it stand out more.
I layered up cut out pieces from the Heidi Swapp paper with embellishments from the kits, also adding a few enamel dots as a finishing touch


CHA Week - Pick of the new goodies

Hi!

This weekend has been the CHA mega show trade show over in the US and paper craft manufacturers have been debuting their new lines. I've been busy looking out for the new trends and trying to pick out the most usable stuff coming out of CHA to turn into trendy but usable kit goodies for you and I'll post up some of my findings here over the next few days so you can let me know what you think.

I'm going to start with American Crafts and here's what's caught my eye from their new collections:
The line that most caught my eye is probably aesthetically the most boring but in terms of usability it's one of the most usable product lines I've seen so far. It's the DIY shop line. It's a line of basics but done in what I kind of think of as 'modern classic' basics so there's the chalkboard, cork and woodgrain. These will go with anything you mix them with so they're something that's not going to be taking up room in your stash they'll definitely be a go to for loads of different projects.
The trend for wooden shapes is still going strong and American Crafts have some really cute ones. I particularity liked the Daydreamer ones.
Brush script is an up and coming trend and it's prevalent in the new Amy Tangerine line Plus One. I particularly liked the tags from this line as they have a nice mix of brush images and text so they'd be great to add a little touch of that trend to any project.
As it's American Crafts obviously there are lots of new Thickers alphabet stickers on offer. My pick was the hammer key style ones from the Dear Lizzy line 'Daydreamer'. The red/orange colour I think is really striking and it's a style that would work for lots of different subjects as it's got a little bit of vintage style but the colour makes them modern and up to date at the same time so they'd work well for everyday projects too.

Next is Crate Paper. Crate Paper have three new lines that I've seen so far 'Boys Rule', 'Styleboard' and 'Oh Darling'. They've stuck with a couple of the current trends of metallic gold and florals which I still like but it'd have been nice to get something different too. I did pick up on a couple of 2014 trends I've spotted, sky/cloud paper and cork board paper. I really love the corkboard paper actually and I could see it maybe used as something interesting for diecutting?


I'm moving onto Websters Pages next. I mentioned the cloud paper/embellishment trend. I guess it comes with Spring/Summer feeling collections but I'm loving it and I really liked it in the new Websters Pages.


Being Websters Pages obviously lots of the collections are very feminine which I think can work well for everyday projects in small doses but I appreciate they're not going to be for everyone. The vellum papers though would work for all kinds of everyday subjects/projects. I really liked the bird pattern overlay too. The paper sheets with the mini cards pattern also caught my eye. These would make great embellishments when they're cut out from the sheet and I think these work well in the Lite kits as you can use them as paper or embellishments.

Fancy Pants next! They always bring something different to the table and I really like the quirky colour combination on their new 'As You Wish' line. Those little library pockets and envelopes I think are really cute and they'd be good for your regular scrapbooking or cardmaking as well as being good in pockets if you're using pocket pages in your scrapbooking.


Thinking about things good for pocket style scrapbooking, these caught my attention too. We had some of the Jillibean Soup Placemats in a main kit last year and this year they have these cute smaller ones coming out. I really like how they're the plain die cut cardstock because you can use your choice of patterned paper behind them to give them the look you want to match any project you're working on.


I'll wrap today up with Pink Paislee. The main little goodies that caught my eye are the chipboard alphabet packs in each of their new lines. I really loved this striped one from the 'Hello Sunshine' line.

I'll be back with the next round that'll include Heidi Swapp, Studio Calico, Simple Stories and Basic Grey. I've also been looking for some more off the radar and unusual bits and pieces.
Somewhere in between the CHA stuff I'll be sharing the next kit sneak peeks too. I've got some amazing goodies for you from Kesi'Art and something really fun and custom made to share too!
x Leo

Showcasing the stamps

When my son's graduation photo arrived we had many more copies that we needed (even though we had the smallest packet available!) So I decided that I could use one of them to record some memories of the special day. I wanted to feature black, grey and red. Red is quite a hard colour to use when scrapping as if you use it in mists and paints (other than with a rainbow of colours) they it can look like you cut yourself whilst crafting! So I decided to bring in the stamps from the Five Gold Stars kit in order to allow some red into the mix. I am a nervous stamper - even after all these years of trying - so these stamps are perfect for me as you can stamp them on separate card stock and then cut round them to place wherever you like.

I love this strking black and white print from the Its Been kit but it needed toning down so as not to overpower the rest of the layout. I added some gesso over most of the page and allowed it to dry (it doesn't take long!)

While I was waiting I stamped and embossed using versamark and black fine detail embossing powder. I then coloured them in using  red and green distress inks and a waterbrush. The only exception was the laurel which was stamped using a green ink, outlined with black pen and cut out. Using embossing powder in this way makes colouring in easier as you can't go outside the lines quite as easily.

 I created a layered photo mat with the papers from the Lite Kit, including two of the cut off strips from the bottom. One of the papers was punched down one side using an American Crafts border punch.

I then layered up the silver circles from the kit with lots of the Heidi Swapp stickers. 

Outlining with black pen really made the words stand out. I covered one of the chipboard arrows from the embellishment kit in patterned paper as well
 Then it was just a case of adding lots of words about the day.
NB I'm sure my son would want you to know his degree is in Computer Games Programming - not just playing the games - but I ran out of room to write any more!

Creative Resolutions and Solutions

Hi!
Leo back again and I've got a couple of finished projects to share. At the end of my last post I said I'd got a layout project to share with new years resolutions and here that is first. I decided to make them creative ones and then I'll see if I can make some more pages as the year goes on to see what the outcomes are. I've mixed up all my kit bits and pieces so it's a layout using a jumble of all three November/December kits.


I really love this star diecut paper in the main kit and I've used it on the layout fixing it to the card background with 3D foam pads so that there's a little definition in the star cut outs. I've also cut out pieces of the gold cardstock from the Lite kit and used it behind the star cut outs.

The sub title I've hand cut out from the gold card. It was one of the ideas I had when I put the gold card in the Lite kit as I've seen lots of cut out titles as a trend just lately and adding that to the on trend use of metallic foil gold as an accent and I think it works quite well?


It was really easy to do I just used a paint program to write out the title making sure the letters were touching and then printed it out on the back of the gold cardstock using the 'print mirror image' print function on the printer. It should be under your printer properties when you're printing out or you could mirror the text before you print instead.

Next I've got another crafty organizing idea to share.
I have lots of little ribbon and trim off cut pieces and so I was thinking of a way to organize them and trying to incorporate using up some stash like my last post about making the scrapbook notebook. I set about sketching out some ribbon wraps but instead of making them simple cards I thought I'd give them a bit of character and at the same time making them into something that could be decorated so I came up with these cat and bow ribbon wraps. I've made them into a printable so if you want to download them just click on the image bellow.


The ribbons and trims I put into colours or type and then just wrapped them around and cut notches in the edges of the cards to fix the ends in so they can be pulled away from the wrap.

I kept mine simple and printed them on a thick brown cardstock but you could also print them on patterned paper then glue them to a cardstock and cut them out or add colour to them with pens or paints.
I've got a couple more organizing ideas that I'll get onto later on next week.

Tomorrow is the start of the CHA mega trade show where lots of the craft manufacturers debut their latest collections. I've already been busy picking out what's caught my eye and picking up on the 2014 trends so far from the new collections and I've put together some little inspiration boards that I'll share through the CHA week so look out for those popping up here and/or on Twitter. I'm also working on the finishing touches to the next kits coming up at the end of the month there's a Pinterest board to check out where I've been pinning sneaks and inspiration, http://www.pinterest.com/craftytemplates/januaryfebruary-2014-quirky-kits-pinboard/
x Leo

All dressed up

The latest Quirky Kits are so full of sparkle it makes it easy to juj up your page (is that how you spell juj? I have no idea!)
This layout mostly uses Daily Countdown but with the addition of the gold card from It's Been
As soon as I saw it I knew that I wanted to put some of the gold behind the Colour wash die cut paper. And then I decided to try adding some of the white organza with gold stars as well. And here is the result
its quite shiny!
The photo was matted on the gold card and some Crate Paper striped paper (from Its Been)
The organza layer came next which was stuck down with tape on the back and with the lovely washi tape from the Five gold stars embellishment kit
helped along with the fabric brads
The title is mostly from the kit although the small letter stickers are Cosmo Cricket, from stash
I adhered the Printshop transparency with glossy accents and used all three of my gold arrows above. They are just so gorgeous
The final touch was to add one of the star shaped clips from the Embellisment kit


Now You Are Five - with Daily Countdown

Hello, and a Happy New Year to you all!

Are you back to normality yet? For me, not so much, I have a fair bit of housework to catch up on when the kids go back to school!

Christmas is a busy time for everyone but when there is a birthday thrown into the mix, there is a fair bit of extra thinking to be done. So I wasn't planning on having a huge celebration for DS2's 5th Birthday but he clearly had big expectations and I really didn't have the heart to let him down! So here we were 4 days before Christmas...
I used 3 PPs from the main kit to make this layout, AT Grainy Goodness, Heidi Swapp Playful and the GORGEOUS Pink Paislee Spectrum. Sometimes I think that you have to let the beauty of a particular paper shine through, and this is one of those occasions. I kept my layout fairly minimal for this reason. For dimension and interest I did some machine sewing on the chevron arrows, part fussy cutting the star out of the playful PP and lifting out the points and added delicious little gold accents here and there with washi, stickers and embossing powder.
You may wonder why there is a gold-embossed veneer arrow seemingly dumped in the middle of the second photo? If you look very closely you can see framed within two little halfmoon shapes which are DS3's teethmarks... he climbed up the kitchen surface top, pulled the cake onto the floor and thankfully that was the only damage that was done before I caught him, disaster averted! Oh, and if you are really sharp eyed you may notice the date stamp says the 12 of Dec? Curse you mirror image rubber!! Still, I know that the date was the 21st and in years to come (when my work is a valuable antique obvs!:D) 9 days won't matter so much...

Any questions? Jot them down in the comments and I'll be happy to reply,

See you soon!

Nikki xxx

Organising Ideas - Making a scrapbook notebook

Happy new year!

The start of a new year is a good time to start sorting and organising so over the next week or so I wanted to look at some ideas for creating things that help with organising your scrapping. I've also been using papers and goodies from last years kits to make these so if you have kit leftovers pile them into a box and grab them together to see what you can create with them. Putting them together gives you an idea of what will mix well with what.

For today I've got an idea to create a 'scrapbook notebook'. I use notebooks or loose sheets of paper a lot for scribbling down ideas or sticking things in or trying ideas out before using them on cards or scrapbook pages so a notebook is always an invaluable thing to have in your supplies to keep your inspiration going.
This is a simple bookbinding technique too so you can take the idea and make your pages from anything you want to. Maybe you want to make an art journal - make your pages from heavy weight paper or a mixture of handmade paper and watercolour paper that will take lots of ink and paints. If you like keeping a journal for writing in how about a mix of scrapbook papers with lined paper so you can make a book of mini scrapbook pages and pages of journaling. Making your own book is a great opportunity to make it exactly what you want.
For the inside of this book I wanted to make pages that I could try out ideas on so I've included pieces of scrapbook paper and I also wanted spaces for sketches so I've made some plain paper with squares printed on them so the squares can be filled in with an idea for a scrapbook page. I've also included plain pages where I can make notes or other things like magazine clippings can be glued in. That could be another idea for a notebook, going through all your old magazines and clipping out what you want to save and gluing it in your finished book. OK onto the step by step!

Step 1
Start out with a piece of paper and cut it to 12 x 6 1/4 inches then fold it in half.


To this folded paper I added some plain paper pages. I wanted to pre-printed squares on the pages so I made a print out sheet with a square on one half of the paper. I've uploaded the sheet as a PDF which you can download here if you want to use the same one. I printed off five sheets then put the same sheets back in the printer and printed the sheets again on the backs so each sheet of paper has the print on both sides. I've cut the pages down to 6x6 inches when folded. This is the stage you can adapt your book pages to suit you. Print off lined paper or grid paper or use handmade papers or watercolour papers for your pages - anything you want to make your pages from use it at this stage.


Put the five folded pages inside the folded scrapbook paper.

 
Repeat these steps and make six of these mini booklets using different scrapbook papers for the outer bits.

 
At this stage you need to fix the outer page and the inner pages together. With my book I've used a sewing machine and a large loose stitch. alternatively you could use staples or use hand stitching just making two or three large stitches just to keep the pages tacked together. If you are sewing use a paper clip to hold the pages together while you sew to stop them moving around. Sew along the fold.


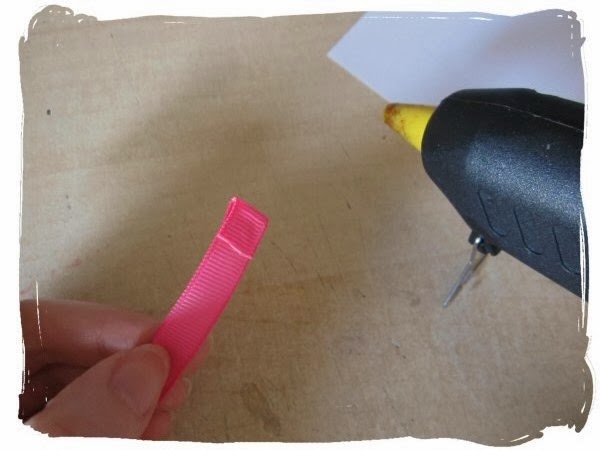
For the next step you'll need a piece of wide ribbon, (I've used a scrap from the Candy Floss Cart Quirky Kit) two binder clips, (or bulldog clips or you can use string if you don't have these) and a glue gun. You could use other glue too if you don't have a glue gun but drying times will be longer if you're using a wet glue.
 
Take the six booklets you've made and stack them together to the edges are neatly matched up. Use the binder clips to hold together the stacked pages. If you don't have binder clips use some string to tightly tie the stack together.

 
Make sure the folded ends of the booklets are tightly compacted together.

 
Apply lots of glue gun glue all along the folded edges.

 
Take the piece of ribbon and push it over the top into the glue so it glues together all the edges of the booklets. Leave it to dry with the binder clips, (or string) still in place.


Trim then fold the edges of the ribbon down and glue down to fix in place and create a neat edge.
 
Take another piece of narrower ribbon, (this will be your bookmark for inside your notebook) and fold down the end adding a bit of glue to fix it down.


Glue it to the top edge of your ribbon spine letting the edge of the ribbon trail out of the top of the book.
 
Next I've made the book cover. Measure your spine and book cover and cut out a piece of cardstock, (this one was also from the Candy Floss Cart kit) to a size slightly larger. Score some lines down the middle of the cardstock the same size as your spine. Mine ended up 3/4 inches so I've made a 3/4 inch gap down the middle of the card and scored lines along side it. Because I'm using up a piece of 12x12 cardstock and my book pages are 6x6 I needed to make my cover 6 1/4 x 6 1/4 inches so I've cut out some strips of card from the cut off part and glued them to the edges to make the finished cover the right size.


Next you'll need to create your cover decoration. I'm using up papers so I've gathered together my cut off paper pieces from making the mini booklets earlier and added in a couple more paper pieces from my box of kit left overs. I've cut the pieces down to 6 1/4 inches and then cut them in half to use as strips to decorate the cover. The middle strip I've scored in the lines again like on the cover piece so it folds nicely when the book's finished.
 
Here's all the pieces glued to the cover. I've added some decorative stitches too.
 
To decorate the book spine I've cut out another piece of paper - this was a paper scrap from the 'Homemade' Quirky Kit Lite.
 
I've glued this to the spine and then added the title on top with the gold stickers from the Daily Countdown Quirky Kit.
 
Next it's time to fix the middle of the book to the cover. To start with you'll need two 6 x 12 inch pieces of scrapbook paper. Go for ones that have a nice weight to them. I've picked out two Websters Pages ones. Score then fold the paper pieces in half with the patterned side you want to show facing inwards.
 
Use the glue gun again and glue the left side of the paper up to the fold on the left side of the cover then fold the paper back over.


Apply more glue to the top edge of the book page section, don't get any on the spine or your book won't open out properly, keep it on the front edge where the ribbon wraps over.
 
Fold the page section over like you're closing the book and press the edge down so the glued area sticks to the folded paper opposite.

Repeat all this with the back of the cover too.

 
Your finished glued book should have a gap along the spine when it's closed up like this:
 
Use your binder clips again to hold your book together while it dries completely.
 
Here's my finished scrapbook notebook. I've added a little bit of decoration to the front just using a cluster of sticker embellishments from kit leftovers.


Inside I've got the printed squares to fill in with scrapbook sketches and plain sides for notes and spaces for adding in magazine cut outs or printouts.


I'll be back on Sunday with another idea for you to create ribbon and twine wraps from your kit leftovers to help organise your supplies. I've got a layout idea to record your new years resolutions too using the Daily Countdown kit.
x Leo