London Photoshoot - 12x12 layouts

Hello everyone,

As promised in the previous post, here today I am sharing two 12x12 traditional layouts I made to record Martins favourites pictures from the photoshoot he had two days before Christmas. It was a wonderful day, but quite chilly, the main areas were London Bridge and Southbank. Here are the products I used for these layouts:

Mysa Lite kit:
  • American Crafts Shimelle Go Now Go, Hike patterned paper sheet
  • Elle's Studio 'Tis the Season Everygreen patterned paper sheet
  • Echo Park Everyday Memories sticker accent sheet embellishments pack
  • Freckled Fawn glitter cork sticker embellishment pack
  • American Crafts Doll Puffy Thickers, alphabet and number stickers embellishment pack

Lagom Main kit:
  • Smooth white cardstock x 1 sheet 12x12
  • Bazzill Aloe Vera canvas texture cardstock sheet 12x12
  • American Crafts Shimelle Go Now Go, Date patterned paper sheet  12x12
  • Simple Stories #Whatever, #Nailedit patterned paper sheet  12x12
  • Echo Park Everyday Memories, Months of the year patterned paper sheet  12x12
  • Chalkboard/watercolour tags set embellishment pack
  • Patterned and icon squares embellishment pack
  • American Crafts Amber Thickers, glitter foam alphabet and numbers embellishment pack


So the first layout includes more structure, it involves two patterned papers and two cardstocks, and as you can see, I kept it simple because to show off the pictures. Each picture also has a small description that gives few facts about the location. Also I draw a black line around to ground the squares and tie in the darker tones from the pictures. The second layout was done in a similar way. However, I add some mixed media to highlight the beautiful red glittery thickers. The snowflakes are made using Cricut and coloured with blue spray, and the colour behind the letters are achieved by using black ink and sponge.


I hope you enjoyed this post and talk to you soon. Agnese

Special December Date Night

Hello everyone,

So continuing with the previous post of mine, I have been recording our December memories at the moment. However, the focus of today project life spread is a particular event that took place in December - Our Date Night. This time it was a very different night, as it was a Friday and it meant that I need to work during the day, while Martins entertained himself by walking around London and exploring London Bridge area. You should look out for the next post, as I made two special layouts with Martins favorite pictures from that photoshoot. But let's get back to this layout, the first page just shows the ending of Martins Christmas party and the beginning of our Date Night.


    The second page starts right after I finished work and we went to Byron to have dinner before the main event of our Date Night. So you might ask what the main event is - A Christmas Carol play, but with a twist. I loved it so much, it was such a unique experience, and I was happy to go after work. But when looking at the theme of this spread, I tried to keep it in blue, pink and cream colour and the products I used from the both kits:

Mysa Lite kit:
  • Simple Stories Frostbite patterned paper sheet 12x12
  • Echo Park Everyday Memories, Journalling Cards patterned paper sheet
  • Freckled Fawn glitter cork sticker embellishment pack
  • American Crafts Doll Puffy Thickers, alphabet and number stickers embellishment pack.
Lagom Main kit:
  • Simple Stories #Whatever, #Nailedit patterned paper sheet  12x12
  • Chalkboard/watercolour tags set embellishment pack
  • Tonic Studios Craft Perfect white sparkling star flower embellishments pack
  • American Crafts Candy Stripe paper clips embellishment pack


Also, I added an additional booklet and tickets to this spread that we received from the play. I thought that the tags that were included in the kit can be used to enforce the tickets and I attached to the booklet. 


I hope you enjoyed this blog post and don't forget to look out for the next post which is connected to this layout. Agnese

It made it all worthwhile

In the photo I have scrapped here I am very cold and very wet and that was at the start of the walk I had to do. But in remembering the disaster that was a walk that only I turned up to, I had great fun making the page...
 I again used a Stuck? sketch
but only had one photo to use so added in the relevant month from the
Echo Park Everyday Memories, Months of the year patterned paper sheet. All the papers and embellishments are from the wonderful Lagom main kit 
I kept pretty firmly to the sketch but did add in a layer at the top. I felt that more of that Simple Stories #Whatever #NailedIt patterned paper needed to be seen as it looked so much like (very pretty) rainclouds.

I chopped, punched and layered the various papers from the kit and outlined them all which matched the January section from the Echo Park paper. I circled the date and emphasised it with glitter glue.
It didn't actually snow but I took artistic license and used the wooden snowflakes anyway, adding some more glitter glue on top. I tucked one of the lovely exclusive cards into my layers, after rounding the corners to echo the tag on the sketch.
As I wanted a long title I decided to use some skinny dies for the letters. That was a good idea until it came to outlining and sticking down. I layered on some die cut stars in various sizes and considered myself done.


Project LIfe - December everyday moments

Hello everyone,

I'm back again with a monthly project life spread and this time my monthly spread has more pages than the previous year December. But let's look at the beginning of December, it was nothing special month although there were a lot of small memories to record like for instance, my husband and I had been learning how to solve Rubik cube original, and Martins got pretty competitive at work there is a vast collection of various ones. While I had to find a dress for my Christmas party at work and a lot of late night for Martins to finish assignments for his studies. 

Some of the products I used:

Mysa Lite Kit:
  • Echo Park Everyday Memories, Journalling Cards patterned paper sheet
  • Echo Park Everyday Memories sticker accent sheet embellishments pack
  • Freckled Fawn glitter cork sticker embellishment pack
Lagom Main Kit:
  • Simple Stories #Whatever, #Nailedit patterned paper sheet  12x12
  • Echo Park Everyday Memories, Months of the year patterned paper sheet  12x12
  • Patterned and icon squares embellishment pack
  • American Crafts Amber Thickers, glitter foam alphabet and numbers embellishment pack


Even though I didn't take any pictures from my Christmas Party, my husband's celebration with work colleagues was different as it's all day event - including different activities around London. As the pictures show, he visited Tower Bridge, Southwark area and finished the evening with a party at Rumpus Room, which I also attended. As you can see when it comes to decorating my cards, I keep quite straightforward them and I try to keep it coherent throughout it. For example, when looking at these two particular pages I tried to have red, gold and cork elements. 


I hope you enjoyed this post and look out for more these type of spreads this week, as the main event of December still ahead. :) Agnese


Flipbook - Winter Hello

Hello everyone,

    
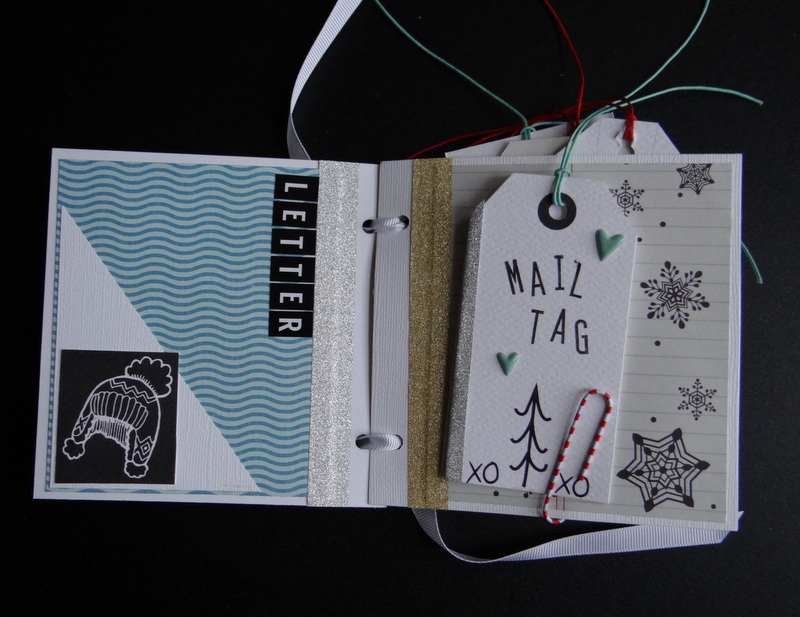
    Finally, I have some time to share my projects with you. I have been quite busy more than during Christmas, which is unusual. I have been loving creating flipbooks for my penpals, and I am always looking for new people to exchange letters and flipbooks. I have been using Mysa Lite and Lagom Main kit for creating this particular flipbook and here are some of the products I used:

Mysa Lite kit:
  • Simple Stories Winter Wonderland, Frostbite patterned paper sheet 12x12
  • Freckled Fawn glitter cork sticker embellishment pack

Lagom Main Kit:
  • Simple Stories Winter Wonderland, Silver White Winter patterned paper sheet 12x12
  • Just Fir You/Candy Stripe patterned paper sheet, (made for the Lagom kit)  12x12
  • American Crafts DIY 4 gold foiled star transparency sheet 12x12
  • Chalkboard/watercolour tags set embellishment pack
  • Patterned and icon squares embellishment pack
  • Snowflake laser cut wood shapes
  • American Crafts Candy Stripe paper clips embellishment pack


How I go about creating a flipbook? The main thing I always have a list of things I need to include, but otherwise I just have fun in creating it. The list includes Letter;  Mail Tag; Tags; Die Cuts; Stickers; More or Extra things and PL cards. For this flipbook, the base of each page was created from using 2 white textured cardstocks in the kit and cutting these papers in 6x5 size. Then I took patterned papers and cut them in 5.5x4. To finish the base I added glittered washi tape from my collection and punched holes in the paper, this allowed to thread white ribbon that holds the book together. However, for the front page of the flipbook I decided to use the beautiful acetate sheet rather than patterned paper, as the simple white textured paper together with that sheet looks so beautiful. 


However, when it comes to decorating, this time I kept it simple as it brings out the beautiful winter papers that were included in the kit. Some of the decorations I did use were - wooden snowflakes, square embellishments, tags, paper clips and finally I used black alphabet stickers from my stash. But throughout the flipbook I used also stamping, which I usually do. The final stage of flipbook is adding the swap goodies for the penpal, most of often I select the ones that are in the same theme as a flipbook or based on the penpals preference.


I hope you enjoyed this post and talk to you soon again, Agnese.

Simplicity!

Hey everyone!

As promised I am back with my next layout and this one is a little more on the simplistic side.
Here's what I used and how I created the layout...

What I Used:
From the Main Kit:

 - 1 sheet of white cardstock
 - Bazzill Craft Classic Smooth cardstock
 - Simple Stories #Whatever #Nailed It patterned paper
 - Both Sides of Pink Paislee Take me Away #18 patterned paper
 - Shimelle Go now Go Date patterned paper
 - Square Heart This Embellishment Card

From the Embellishment Kit:

 - Tonic Studio Perfect Gold Glitter Bow
 - Freckled Fawn Camera Puffy Sticker
 - 1 Chalkboard Wordfetti
 - 1 cut-apart Label
 - 1 Square Embellishment Card "Thank You for being so wonderfully sweet"


Here's how I created my layout.

I started this layout off by using the leftover piece of Simple Stories #Whatever #Nailed It sheet and sticking it down onto the craft cardstock which made about a half an inch border at both the top and bottom of my page. I cut off one of the branding strips and laid that across the lower part of the page and then layered my photo of my two (adorable) puppies onto both sides of the Pink Paislee Take me Away #18 patterned paper as they were a nice contrast to the photo and the background. Above this I placed the square card reading Thank You for being so wonderfully sweet (cause they really are!)


For my little embellishment cluster I placed down the small "Heart This" square card embellishment and laid a cut-apart label on top for a spot of journalling. I then adhered one of the gold bows using some silicone glue to make sure it stuck. For the heart embellishment I used the Shimelle Go now Go Date patterned paper and a scalloped heart punch I had to punch out one of the hearts from the sheet and added a tad more journalling. To finish off I used one of the Freckled Fawn puffy cameras and one of the chalkboard wordfetti's that reads smile, as my puppies make me smile everyday!


I was so lucky I managed to snap the photo of Enya and Bonnie in time as they moved just after I got the shot. I just thought it was so beautiful how they'd managed to make a heart shape with their bodies.
Sometimes the more simplistic layouts have the most impact. I also often think I should do lots of journalling to tell the story, but as I've shown, and proven to myself...sometimes the photo's tell the stories all by their selves!

 I hope you like my layout I cannot wait to add it to the puppies album! Be sure to share your more simplistic layouts over on the Facebook Subscribers group...I'd love to see them!
Until next time...Happy Scrapping!

Mary Poppins!

 Hello Everyone, I'm a bit late uploading these this month, but those of you who are on the Quirky Kits Subscribers Facebook group will already know why...wisdom teeth problems...say no more!

I wanted to finish my Disneyland Paris album before the new year...yep failed that! So I figured I'd go back and create a layout using the Nov/Dec Quirky Kit to show you how versatile they are..This was a winter based kit and I've used it for a Disney layout..I'm really pleased with it too.
Here's what I used and how I created this layout...

What I Used
From the Main Kit:
-1 Sheet of White 12x12 Cardstock
- Shimelle Go Now Go Date Patterned Paper
- Simple Stories #Whatever #Nailed It Patterned Paper
- American Crafts DIY Foiled Star Transparency Sheet
- American Crafts Amber Foam Thickers

From the Embellishment Kit:
- American Crafts DIY shop gold sparkle twine
- American Crafts Follow Thickers
- American Crafts Candy Stripe Paperclips
- Tonic Studio's Perfect Gold Glitter Bows
- Tonic Studio Perfect White Star Flower Embellishments


How I created my Layout:
I started this layout by deciding where I wanted my photographs as I had one vertical and one horizontal...which for me is always awkward to play with on a layout and I often struggle to know what to do with them. I decided on centre placement as I wanted the photographs to be the main focus.
I cut a 5"x 12" piece from the DIY Shop gold star transparency sheet by American crafts, and used some red liner tape to adhere this in the centre of my page.
I then cut the red/white branding strip off of one of the patterned papers in the main kit and placed this slightly over the transparency so the tape underneath wasn't visible. I did the same with the bottom strip, cutting a branding strip sized piece from the Simple Stories #Nailed it paper.
I then laid the American Crafts Amber Thickers at the top of the photo, and the Follow Thickers at the bottom. As pictured below...


I thought it needed something in the left hand corner and wanted to try something a little different. I got a piece of the DIY Shop gold twine and adhered it under the paper with some double sided tape to make a corner. I then looped on three of the candy stripe paper-clips and to those used some silicone glue to attach the Tonic Studio Star Flowers on top.

I finished off my layout by cutting another piece of the gold twine and popping it under the vertical photo of Mary Poppins and attaching a gold bow to bring all the gold elements together. I then popped my journalling under that photo and voilĂ !

Just goes to show if you think outside of the box you can create anything! I am glad to add this addition to my Disneyland Album...only another hundred layouts to go!!
I will be back later with my next layout using this lovely kit. Be sure to share your creations over on the Facebook group and I love to see what you've all done with the kits.
Until my next post...Happy Scrapping!!